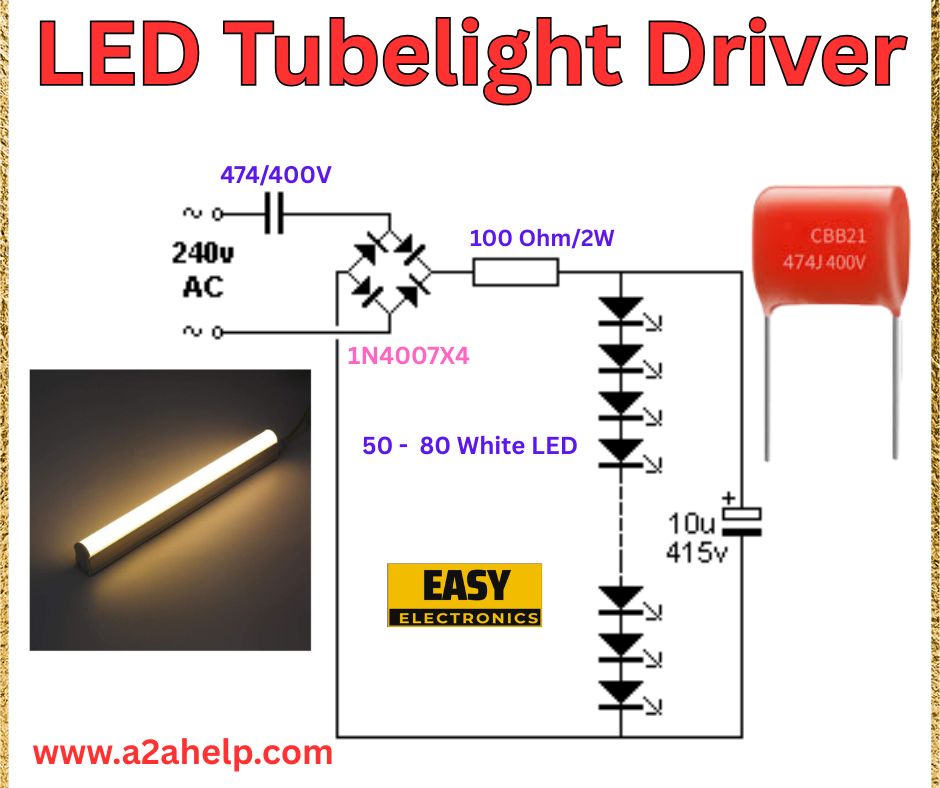
Are you looking to create an energy-efficient lighting solution at home? Building an LED tubelight driver circuit is a fantastic DIY electronics project that can power 50-80 white LEDs with a standard 240V AC supply. This guide will walk you through the components, circuit analysis, assembly steps, and tips to get your LED tubelight working perfectly. Let’s illuminate your space with this exciting project!
What is an LED Tubelight Driver?
An LED tubelight driver is a circuit that converts AC voltage to a suitable DC voltage and current to power LED tubelights. This particular design uses minimal components to drive 50-80 white LEDs, making it cost-effective and easy to assemble. It’s ideal for replacing traditional fluorescent tubelights with eco-friendly LED alternatives.
Components Required
To build this LED tubelight driver, you’ll need:
- 1N4007x4 Diodes: Four diodes for the bridge rectifier.
- 100Ω / 2W Resistor: Limits current to the LEDs.
- 474J/400V Capacitor: Acts as a step-down capacitor for voltage dropper.
- 10µF / 415V Capacitor: Smooths the DC output.
- 50-80 White LEDs: Forms the tubelight array.
- 240V AC Power Supply: Standard household power source.
Circuit Diagram Analysis
The schematic is simple and efficient. Here’s a breakdown:

- Input Stage: The 240V AC supply is connected to a 474J/400V capacitor, which steps down the voltage.
- Rectifier Stage: Four 1N4007 diodes form a bridge rectifier to convert AC to DC.
- Current Limiting: A 100Ω / 2W resistor controls the current flowing to the LED array.
- Smoothing: A 10µF / 415V capacitor filters the DC output for stable LED operation.
- LED Array: 50-80 white LEDs are connected in series, powered by the rectified and regulated voltage.
Step-by-Step Assembly Guide
- Gather Your Tools: Use a soldering iron, solder, wire cutters, and a heat-resistant surface.
- Build the Bridge Rectifier: Connect the four 1N4007 diodes in a bridge configuration.
- Add the Step-Down Capacitor: Solder the 474J/400V capacitor across the AC input.
- Install the Resistor: Connect the 100Ω / 2W resistor between the rectifier and LED array.
- Attach the Smoothing Capacitor: Solder the 10µF / 415V capacitor across the DC output.
- Connect the LEDs: Wire 50-80 white LEDs in series and connect them to the circuit.
- Power the Circuit: Plug into a 240V AC supply and test the tubelight.
Tips for Success
- LED Count: Adjust the number of LEDs (50-80) based on the desired brightness and voltage drop.
- Safety: Work with AC power cautiously and ensure all connections are insulated.
- Heat Management: The resistor may heat up; mount it on a heat sink if needed.
Applications of an LED Tubelight Driver
- Replace traditional fluorescent tubelights in homes or offices.
- Create custom LED lighting for DIY projects.
- Learn about AC-to-DC conversion and LED driving.
Troubleshooting Common Issues
- No Light: Check the AC supply and diode connections.
- Flickering: Ensure the smoothing capacitor is properly connected.
- Overheating: Verify the resistor wattage and LED current.
Conclusion
Building an LED tubelight driver is a rewarding way to embrace energy-efficient lighting. With this guide, you can assemble a reliable circuit to power your LED tubelight. Visit www.a2ahelp.com for more electronics projects and tutorials. Light up your space today!
