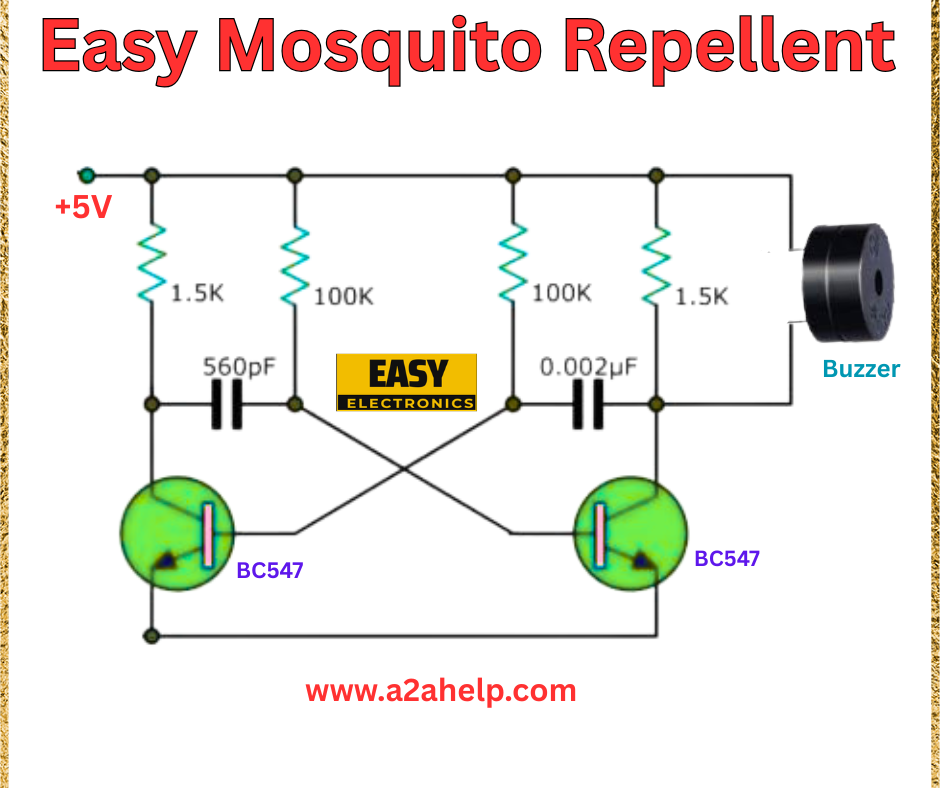
Are you tired of pesky mosquitoes ruining your peaceful evenings? Building a mosquito repellent circuit is a simple and effective DIY electronics project that can help keep these insects at bay. Using an ultrasonic buzzer, this device emits high-frequency sound waves that repel mosquitoes without the need for harmful chemicals. In this detailed guide, we’ll walk you through the process of creating your own mosquito repellent using the circuit diagram provided. Let’s get started!
What Is a Mosquito Repellent Circuit?
A mosquito repellent circuit generates ultrasonic sound waves, typically above the human hearing range (20 kHz), which are uncomfortable for mosquitoes, driving them away. This particular design uses affordable components and operates on a 5V power supply, making it an accessible project for electronics enthusiasts and homeowners alike.
Components You’ll Need
To construct this mosquito repellent circuit, gather the following materials:
- 5V DC power supply
- BC547 NPN transistors (x2)
- 1.5kΩ resistors (x2)
- 100kΩ resistors (x2)
- 560pF capacitor
- 0.002µF capacitor
- Ultrasonic buzzer
- Connecting wires
- Soldering kit and breadboard (for prototyping)
Understanding the Circuit Diagram

- Transistors (BC547): Two BC547 transistors are configured in an oscillator circuit to generate the ultrasonic frequency.
- Resistors (1.5kΩ and 100kΩ): These set the bias and feedback for the oscillator, ensuring stable operation.
- Capacitors (560pF and 0.002µF): These determine the frequency of the ultrasonic waves produced.
- Buzzer: Emits the high-frequency sound waves to repel mosquitoes.
- Power Supply: A 5V DC source powers the circuit.
Step-by-Step Construction Guide
Step 1: Set Up the Oscillator Circuit
- Connect the two BC547 transistors in a cross-coupled configuration.
- Attach the 1.5kΩ resistors between the 5V supply and the transistor bases.
- Link the 100kΩ resistors between the collector of one transistor and the base of the other to create feedback.
Step 2: Add the Capacitors
- Place the 560pF capacitor between the collectors of the two transistors.
- Connect the 0.002µF capacitor across the emitter and collector of one transistor to fine-tune the frequency.
Step 3: Integrate the Buzzer
- Wire the ultrasonic buzzer to the collector of one transistor and the ground.
- Ensure the buzzer is rated for the frequency range (typically 20-40 kHz) to effectively repel mosquitoes.
Step 4: Power and Test
- Connect the 5V DC power supply to the circuit.
- Turn on the power—if the circuit is wired correctly, the buzzer should emit a high-pitched sound (inaudible to humans) indicating it’s working.
Benefits of a DIY Mosquito Repellent
- Eco-Friendly: No chemicals or sprays, making it safe for families and pets.
- Cost-Effective: Uses inexpensive, readily available components.
- Customizable: Adjust capacitor values to target different mosquito species.
Troubleshooting Tips
- No Sound: Check the power supply and transistor connections.
- Weak Output: Ensure the buzzer is compatible with the generated frequency.
- Overheating: Verify resistor values to prevent excessive current draw.
Why Choose This Project?
This mosquito repellent circuit is perfect for anyone interested in electronics or looking for a natural pest control solution. With components easily sourced online or from local stores, you can assemble it in under an hour. Plus, it’s a great way to enhance your home environment while honing your DIY skills.
Conclusion
Building an easy mosquito repellent circuit is a practical and rewarding project that combines simplicity with effectiveness. By following this guide and using the provided circuit diagram, you can create a device to keep your space mosquito-free. Visit www.a2ahelp.com for more exciting electronics projects and start your DIY adventure today!
