Are you looking to enhance your home automation skills or create a DIY security solution? A motion detection light switch using a PIR (Passive Infrared) sensor is an excellent project for beginners and experienced electronics enthusiasts alike. This guide walks you through the process of building your motion-activated light switch, complete with a detailed circuit diagram and step-by-step instructions. Let’s dive into this exciting electronics project!
What is a PIR Sensor?
A PIR sensor, or Passive Infrared Sensor, detects infrared radiation emitted by moving objects, such as humans or animals. When motion is detected, the sensor sends a signal to activate connected devices, like lights. This makes it an ideal choice for energy-efficient lighting solutions and security systems.
Components Needed
To build your motion detection light switch, gather the following components:
- PIR Sensor Module
- 6V Relay Module
- BC547 Transistor
- 1kΩ Resistor
- IN4007 Diode
- 110/220V AC Light Bulb
- Power Supply (6V DC)
- Connecting Wires
- Breadboard or PCB
- Soldering Kit (optional)
Circuit Diagram Explanation
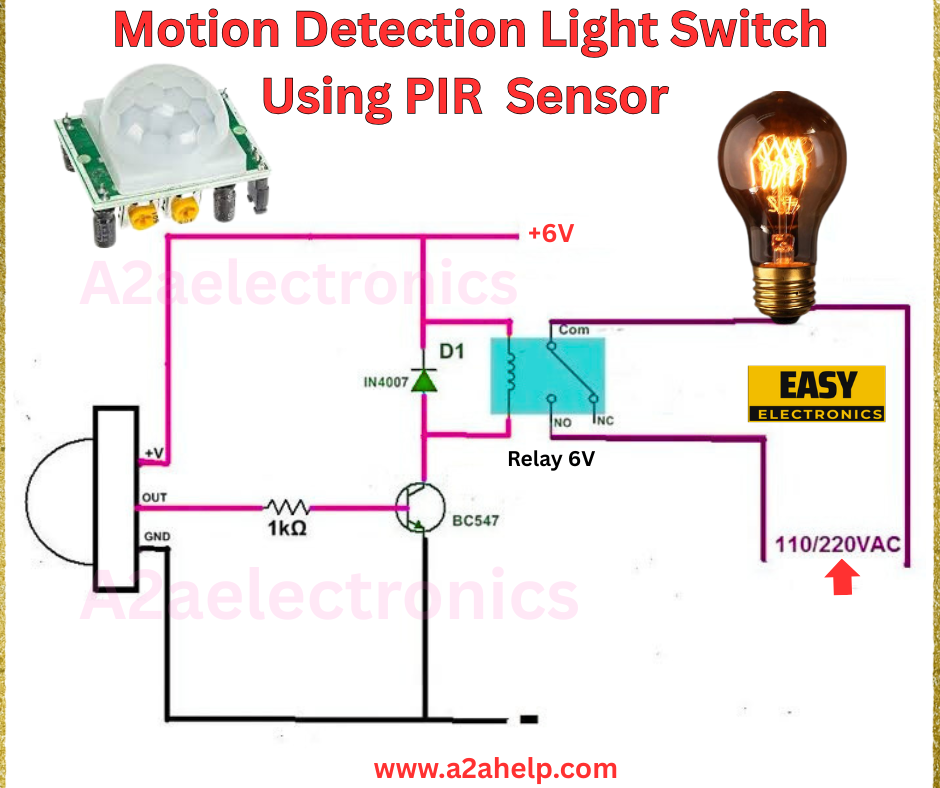
The image above provides a clear circuit diagram for the motion detection light switch. Here’s a breakdown of how it works:
- PIR Sensor Connection: The PIR sensor’s OUT pin is connected to the base of the BC547 transistor through a 1kΩ resistor. The +V and GND pins are connected to the 6V power supply.
- Transistor and Relay: The BC547 transistor acts as a switch, controlling the 6V relay. The relay’s coil is connected to the transistor’s collector, with the IN4007 diode placed across the coil to protect against voltage spikes.
- Relay and Light: The relay’s Normally Open (NO) and Common (Com) terminals are wired to the 110/220V AC light bulb. When the relay is activated, it completes the circuit, turning on the light.
- Power Supply: A 6V DC power source energizes the circuit, ensuring safe and efficient operation.

Step-by-Step Guide to Build the Motion Detection Light Switch
Step 1: Gather Your Tools and Components
Ensure all components are in working condition. A breadboard is recommended for prototyping, but you can solder the circuit onto a PCB for a permanent setup.
Step 2: Set Up the PIR Sensor
Connect the PIR sensor’s +V pin to the 6V positive terminal, GND to the negative terminal, and OUT to the 1kΩ resistor. The other end of the resistor should connect to the base (B) of the BC547 transistor.
Step 3: Wire the Transistor and Relay
- Connect the emitter (E) of the BC547 to the ground.
- Link the collector (C) to one end of the relay coil, with the IN4007 diode placed across the coil (cathode to +6V, anode to collector).
- Connect the other end of the relay coil to the +6V supply.
Step 4: Connect the Light Bulb
Wire the relay’s NO terminal to the live wire of the 110/220V AC light bulb. Connect the Common (Com) terminal to the power source, and ground the neutral wire of the bulb.
Step 5: Test the Circuit
Power on the 6V DC supply and move in front of the PIR sensor. The light should turn on when motion is detected and turn off after the sensor’s delay period. Adjust the sensor’s sensitivity and delay settings as needed.
Benefits of a PIR Motion Detection Light Switch
- Energy Efficiency: Lights only turn on when motion is detected, saving electricity.
- Enhanced Security: Ideal for illuminating dark areas when movement is sensed.
- Easy Installation: Simple circuit design suitable for DIY enthusiasts.
Troubleshooting Tips
- Light Not Turning On: Check the power supply and ensure all connections are secure.
- False Triggers: Adjust the PIR sensor’s sensitivity or relocate it away from heat sources.
- Relay Clicking but No Light: Verify the AC wiring and bulb functionality.
Conclusion
Building a motion detection light switch using a PIR sensor is a rewarding project that combines practical electronics with home automation. Whether you’re a hobbyist or a professional, this guide provides everything you need to get started. Visit www.a2ahelp.com for more DIY electronics projects and tutorials. Start your journey today and illuminate your space with smart technology!
