Are you fascinated by the mesmerizing arcs of electricity produced by a Tesla coil? Building a high power Tesla coil at home is an exciting project for electronics enthusiasts and hobbyists. In this detailed guide, we’ll explore how to construct a high power Tesla coil using a 555 timer, IRF540 MOSFET, and a custom-wound coil. Let’s dive into the process and create your own stunning electrical marvel!
Understanding the High Power Tesla Coil
A Tesla coil is a resonant transformer circuit that generates high-voltage, low-current electricity, producing impressive electric arcs. The circuit in the image uses a 555 timer to generate high-frequency oscillations, driving a MOSFET to power the coil. This design is perfect for demonstrating electromagnetic principles and creating a captivating display.
Components Required
- 555 Timer IC: For pulse generation.
- IRF540 MOSFET: High-power switching MOSFET.
- 1N4148 Diodes: Two for protection and rectification.
- 1N4005 Diodes: Two for rectification in the coil circuit.
- Resistors: 620Ω, 100Ω, 82kΩ, 6.8kΩ, 56Ω, 10Ω.
- Capacitors: 100nF, 10nF.
- Coil: 1000 turns of 34SWG wire on a 25mm former, with a 10-turn 21SWG primary coil.
- 12V Power Supply: To power the circuit.
- Connecting Wires and Heat Sink: For assembly and heat management.

Circuit Diagram Analysis
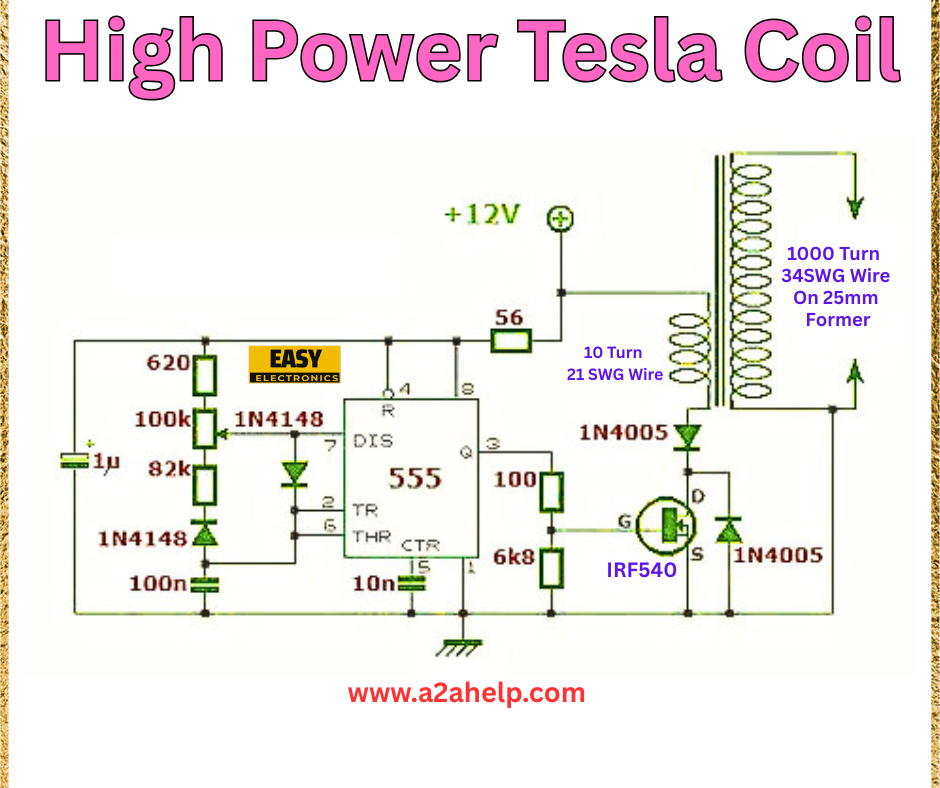
The circuit diagram provides a clear blueprint for building the Tesla coil. Here’s a breakdown of the connections:
- Power Supply: A 12V DC supply powers the circuit.
- 555 Timer Section: The 555 timer is configured in astable mode. Pin 2 and 6 are connected to a 100nF capacitor, with a 82kΩ resistor and 620Ω resistor setting the frequency. Pin 7 connects to a 10nF capacitor, and pin 3 provides the output pulse.
- MOSFET Driver: The output from pin 3 drives the IRF540 MOSFET via a 56Ω resistor. A 6.8kΩ resistor and 10Ω resistor stabilize the gate.
- Coil Assembly: The primary coil (10 turns of 21SWG wire) is connected to the MOSFET drain, while the secondary coil (1000 turns of 34SWG wire on a 25mm former) generates the high voltage. Two 1N4005 diodes protect the circuit.
- Protection: Two 1N4148 diodes and a 100Ω resistor safeguard the 555 timer.
How the High Power Tesla Coil Works
The 555 timer generates a high-frequency square wave, which drives the IRF540 MOSFET. This switching action creates an oscillating magnetic field in the primary coil. The secondary coil, with its 1000 turns, steps up the voltage to produce high-voltage arcs due to resonance between the coils and capacitors. The diodes ensure the circuit remains protected from voltage spikes.
Step-by-Step Assembly
- Set Up the 555 Timer: Wire the timer with the resistors and capacitors as per the diagram on a breadboard.
- Connect the MOSFET: Attach the IRF540 with a heat sink, connecting the gate to the 555 output via the 56Ω resistor.
- Build the Coil: Wind the primary coil (10 turns) and secondary coil (1000 turns) on a 25mm former. Ensure proper insulation.
- Assemble the Circuit: Connect the coils, diodes, and remaining resistors as shown.
- Power and Test: Apply 12V and adjust the frequency if needed. Observe the arcs from a safe distance.
Tips for Optimization
- Coil Tuning: Adjust the number of turns or capacitor values for optimal resonance.
- Safety: Use a heat sink for the MOSFET and operate in a well-ventilated area.
- Insulation: Ensure the secondary coil is well-insulated to prevent arcing to the primary.
Benefits of a DIY Tesla Coil
- Educational: Learn about resonance, high voltage, and circuit design.
- Impressive Display: Create stunning visual effects for science projects or demonstrations.
- Cost-Effective: Build it at home with affordable components.
Safety Precautions
- Handle high voltage with care to avoid electric shock.
- Keep flammable materials away from the arcs.
- Use protective gear and test in a controlled environment.
Conclusion
Building a high power Tesla coil is a thrilling way to explore the wonders of electronics and high-voltage physics. With the right components and a clear understanding of the circuit, you can create an awe-inspiring device. Visit www.a2ahelp.com for more DIY electronics projects and tutorials. Start your Tesla coil journey today and light up your curiosity!
