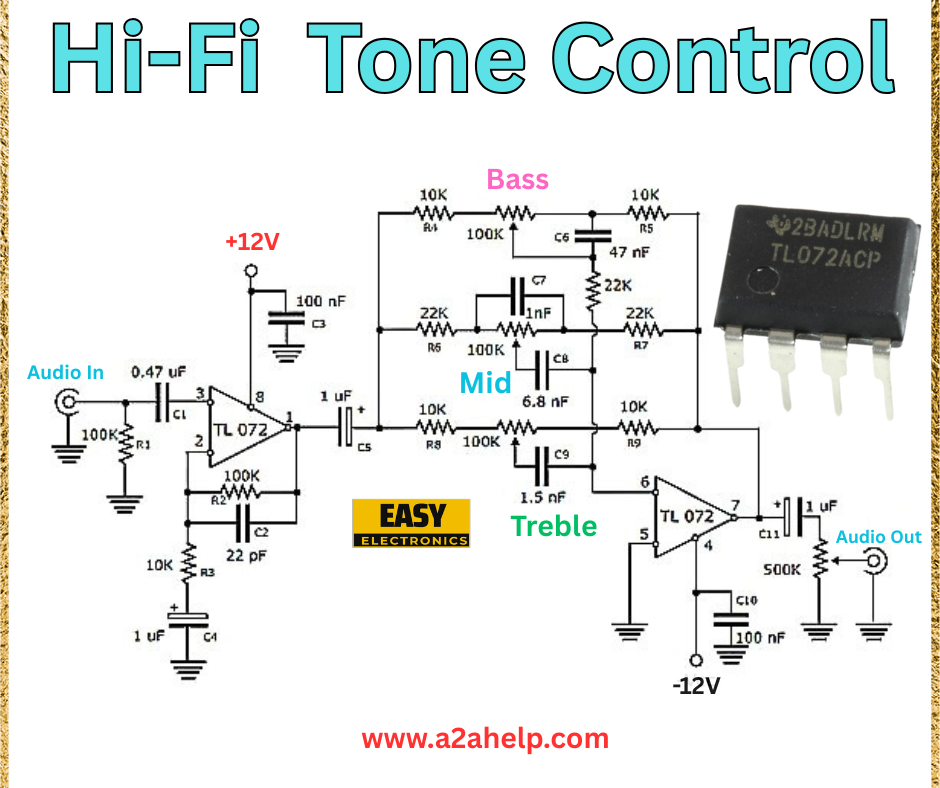
Are you an audio enthusiast looking to enhance your sound system with customizable bass, mid, and treble controls? A Hi-Fi tone control circuit is the perfect solution to fine-tune your audio output. In this detailed guide, we’ll explore how to build a Hi-Fi tone control circuit using the TL072 op-amp, a popular choice for high-fidelity audio applications. This article includes a step-by-step breakdown, component list, and circuit analysis to help you create a professional-grade tone control system.
What is a Hi-Fi Tone Control Circuit?
A tone control circuit allows you to adjust the bass, midrange, and treble frequencies of an audio signal, giving you full control over the sound quality. The TL072, a dual low-noise operational amplifier, is ideal for this project due to its excellent audio performance, low distortion, and wide bandwidth. This circuit is perfect for integrating into amplifiers, preamplifiers, or standalone audio projects.
Components Required
Gather the following components to get started:
- TL072 IC: Dual op-amp for audio processing.
- Resistors: 10KΩ (x6), 100KΩ (x2), 22KΩ (x2), 500KΩ (potentiometer), 47KΩ.
- Capacitors: 0.47µF, 1µF (x2), 100nF (x2), 47nF, 1.5nF, 22pF.
- Power Supply: ±12V DC.
- Miscellaneous: PCB, connecting wires, and a soldering kit.
Understanding the Circuit Diagram

- Input Stage: The audio input is coupled through a 0.47µF capacitor (C1) and a 100KΩ resistor (R1) to the non-inverting input of the TL072.
- Tone Control Section:
- Bass: Controlled by a 10KΩ resistor (R4), 100KΩ resistor (R11), and 47nF capacitor (C6) in a feedback loop.
- Mid: Adjusted with a 10KΩ resistor (R8), 1.5nF capacitor (C7), and a 10KΩ resistor (R9) in the feedback network.
- Treble: Managed by a 500KΩ potentiometer (R10) and 100nF capacitor (C10) for fine-tuning high frequencies.
- Output Stage: The processed audio signal is coupled out through a 1µF capacitor (C11) to the audio output.
- Power Supply: The circuit operates on a dual ±12V supply, decoupled with 100nF capacitors (C3, C10) for stability.
Step-by-Step Assembly Guide
- Prepare the PCB: Design or etch a PCB based on the circuit layout. Ensure proper placement for the TL072 and potentiometer.
- Install the TL072 IC: Solder the TL072 onto the PCB, aligning pin 1 with the diagram. Use a socket to avoid damaging the IC.
- Add Resistors and Capacitors: Place the resistors and capacitors according to the schematic. Ensure correct polarity for electrolytic capacitors (e.g., 1µF).
- Connect the Potentiometer: Wire the 500KΩ potentiometer for treble control, ensuring smooth adjustment.
- Power Supply Setup: Connect the ±12V supply, adding 100nF decoupling capacitors close to the IC pins.
- Final Wiring: Link the audio input and output terminals. Double-check all connections.
- Testing: Power the circuit and test with an audio source. Adjust the bass, mid, and treble controls to verify functionality.
Safety Tips
- Use a regulated ±12V power supply to avoid damaging the TL072.
- Ensure proper grounding to minimize noise.
- Test the circuit with low volume initially to check for issues.
Benefits of This Tone Control Circuit
- High Fidelity: The TL072 ensures low noise and distortion for pristine audio.
- Customizable Sound: Independent bass, mid, and treble adjustments.
- Compact Design: Easy to integrate into existing audio systems.
Troubleshooting Common Issues
- No Sound: Check power supply connections and capacitor polarity.
- Distorted Output: Verify resistor values and ensure the TL072 is not overheating.
- Unresponsive Controls: Ensure the potentiometer is properly wired and functional.
Conclusion
Building a Hi-Fi tone control circuit using TL072 is a fantastic way to elevate your audio experience. With this guide, you can assemble a reliable and adjustable tone control system for your home audio setup or DIY projects. Follow the steps, refer to the circuit diagram, and enjoy tailored sound quality. For more electronics projects, visit www.a2ahelp.com.
