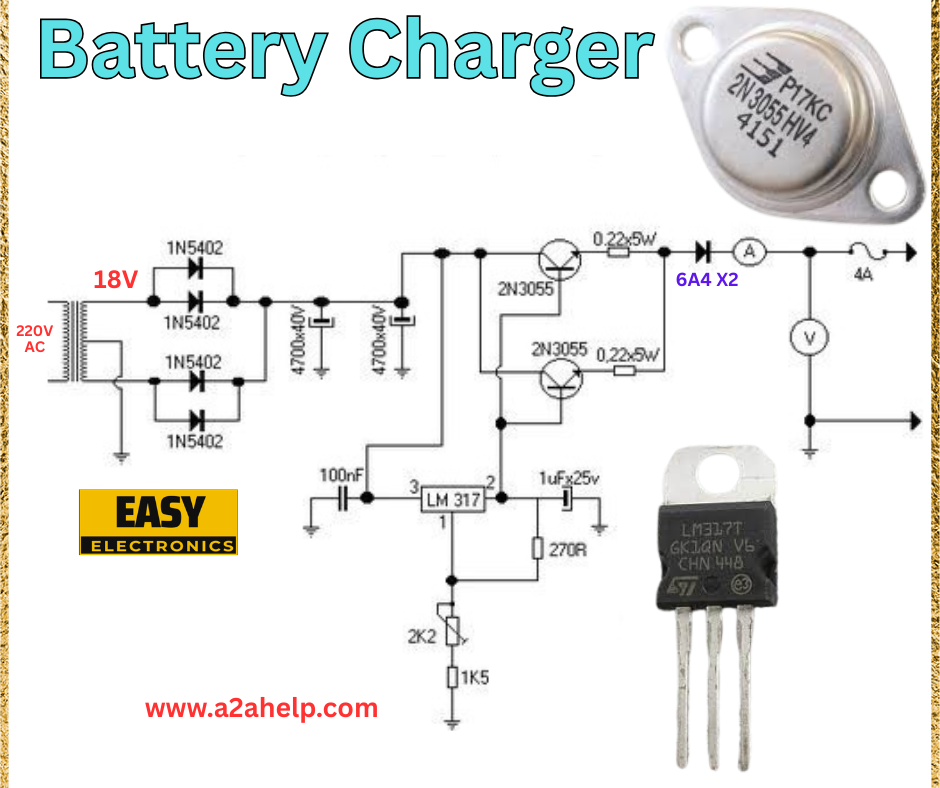
Are you tired of relying on expensive commercial battery chargers? Building your own DIY battery charger circuit is a cost-effective and educational project that every electronics enthusiast should try. In this detailed guide, we’ll walk you through creating a battery charger using a step-down transformer, LM317 voltage regulator, and a few other components. Let’s get started!
Understanding the Battery Charger Circuit
A battery charger circuit converts AC power from a wall outlet into a stable DC voltage suitable for charging batteries. The circuit in the image uses a 220V AC input, stepped down to 18V, and regulated to a safe charging voltage using the LM317 IC. This design is ideal for charging 12V batteries and is perfect for hobbyists looking to expand their electronics skills.
Components Required
- Step-Down Transformer: 220V to 18V.
- Diodes (1N5402): Four for bridge rectification.
- Capacitors: 100nF and 1µF (25V).
- Resistors: 2.2kΩ and 1.5kΩ.
- LM317 Voltage Regulator: For adjustable voltage output.
- 2N3055 Transistors: Two for current amplification.
- 0.22Ω Resistors: Two (5W) for current limiting.
- Connecting Wires and Heat Sink: For assembly and heat dissipation.
- Battery: 12V (to be charged).
Circuit Diagram Analysis
The circuit diagram provides a clear layout for assembling the battery charger. Here’s a breakdown of the connections:
- Power Input: A 220V AC supply is fed into a step-down transformer, reducing it to 18V AC.
- Rectification: Four 1N5402 diodes form a bridge rectifier to convert AC to DC, producing approximately 24V DC (unregulated) after rectification.
- Filtering: A 100nF capacitor smooths the rectified DC voltage.
- Voltage Regulation: The LM317 IC regulates the voltage. The output is set using a voltage divider with 2.2kΩ and 1.5kΩ resistors.
- Current Control: Two 2N3055 transistors, paired with 0.22Ω (5W) resistors, handle current amplification and limiting.
- Output: The regulated voltage and current are supplied to the 12V battery via a 1µF capacitor for stability.

How the Battery Charger Works
The transformer steps down the 220V AC to 18V AC. The bridge rectifier converts this to DC, which is then filtered by the 100nF capacitor. The LM317 adjusts the voltage to a safe level for the battery, while the 2N3055 transistors and 0.22Ω resistors ensure the charging current remains within safe limits. The 1µF capacitor stabilizes the output, protecting the battery from voltage spikes.
Step-by-Step Assembly
- Set Up the Transformer: Connect the 220V AC input to the primary side of the transformer.
- Build the Rectifier: Wire the four 1N5402 diodes in a bridge configuration.
- Add Filtering: Connect the 100nF capacitor across the rectified output.
- Install the LM317: Wire the IC with the 2.2kΩ and 1.5kΩ resistors to set the output voltage (adjustable around 13.8V for a 12V battery).
- Connect Transistors: Attach the 2N3055 transistors with 0.22Ω resistors for current control.
- Final Connections: Add the 1µF capacitor and connect the output to the battery.
- Test the Circuit: Power on and use a multimeter to verify the output voltage and current.
Tips for Optimization
- Heat Management: Attach a heat sink to the LM317 and 2N3055 transistors to prevent overheating.
- Voltage Adjustment: Fine-tune the resistors to match your battery’s charging requirements.
- Safety: Use an enclosure to protect the circuit and ensure proper insulation.
Benefits of a DIY Battery Charger
- Affordable: Save money compared to store-bought chargers.
- Customizable: Adjust voltage and current for different battery types.
- Skill-Building: Gain hands-on experience with power electronics.
Safety Precautions
- Handle the 220V AC supply with care to avoid electric shock.
- Ensure proper grounding to prevent short circuits.
- Monitor the circuit during the initial test to avoid overloading the battery.
Conclusion
Building a DIY battery charger circuit is a practical and rewarding project that combines learning with functionality. With the right components and a clear understanding of the circuit, you can create a reliable charger for your 12V batteries. Check out www.a2help.com for more electronics projects and tutorials. Start your build today and power up your skills!
