Are you tired of weak radio signals while driving? A car antenna signal booster can enhance your radio reception, ensuring clear audio even in remote areas. This DIY project uses a simple circuit design to amplify weak signals from your car antenna, making it a perfect solution for car enthusiasts and electronics hobbyists. In this detailed guide, we’ll walk you through the process of building your own car antenna signal booster step by step.
What is a Car Antenna Signal Booster?
A car antenna signal booster is an electronic circuit that amplifies weak radio frequency (RF) signals received by your car’s antenna. This improves the quality of AM/FM radio reception, especially in areas with poor signal strength. The circuit in this guide operates on a 12V power supply and uses common components to deliver reliable performance.
Key Components
- BC547 Transistors: NPN transistors used as amplifiers in two stages.
- 1N4148 Diodes: Provide signal rectification and protection.
- Resistors: 100Ω, 10kΩ, 1kΩ, 22kΩ, and 47Ω for biasing and gain control.
- Capacitors: 100pF, 0.01µF, and 0.1µF for coupling and filtering.
- Input: Antenna connection.
- Output: Amplified signal to the radio.

Step-by-Step Guide to Building the Car Antenna Signal Booster
1. Gather Your Materials
Collect all necessary components and tools, including a soldering iron, PCB or perf board, wire cutters, and a 12V power source from your car battery. Sourcing high-quality parts from suppliers like Easy Electronics ensures durability and efficiency.
2. Assemble the Circuit
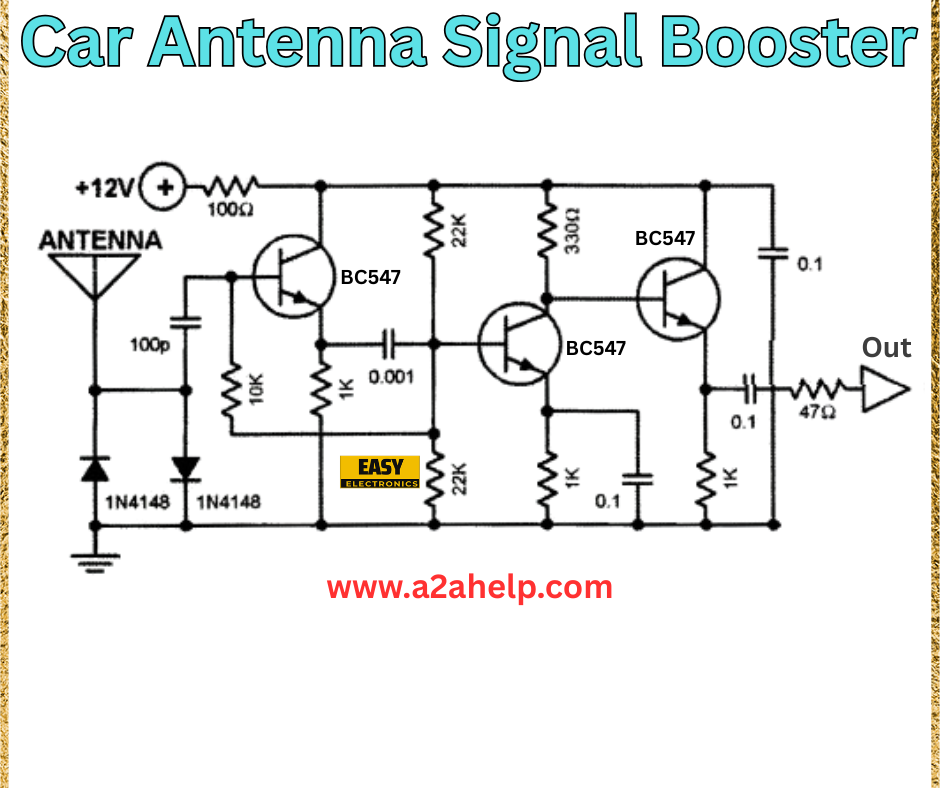
Follow the schematic diagram carefully:
- Connect the antenna input to a 100pF capacitor, then to the base of the first BC547 transistor via a 100Ω resistor.
- Use a 10kΩ resistor and a 1N4148 diode between the base and ground for biasing.
- Link the collector of the first BC547 to a 22kΩ resistor and a 0.01µF capacitor, then to the base of the second BC547.
- Connect a 1kΩ resistor and another 0.01µF capacitor between the base of the second BC547 and ground.
- Attach a 47Ω resistor and a 0.1µF capacitor in series from the collector of the second BC547 to the output.
- Power the circuit with a 12V supply, ensuring proper grounding with the 1N4148 diodes.
3. Test the Booster
Before installing, test the circuit with a multimeter and a signal generator or radio. Connect the output to your car radio and adjust the antenna position to maximize signal strength. Ensure the amplified signal is clear without distortion.
4. Install in Your Car
Mount the circuit in a secure location, such as near the antenna or dashboard, and connect it to the 12V power line. Insulate all connections to prevent short circuits and interference.
5. Fine-Tune Performance
Test the booster while driving in areas with weak signals. Adjust component values or antenna placement if needed to optimize reception.
Benefits of a DIY Car Antenna Signal Booster
- Improved Reception: Enhances weak signals for better radio quality.
- Cost-Effective: Uses affordable, readily available components.
- Customizable: Easily adjustable for different vehicles and signal conditions.
- Compact Design: Fits seamlessly into your car’s setup.
Troubleshooting Common Issues
- No Signal Improvement: Check antenna connections and ensure proper grounding.
- Distorted Output: Verify capacitor and resistor values, or reduce gain by adjusting resistors.
- Overheating: Ensure adequate ventilation and check for short circuits.
Safety Tips
- Disconnect the car battery before installation to avoid electrical hazards.
- Use insulated tools and wear protective gear.
- Double-check all wiring to prevent damage to the radio or circuit.
Conclusion
Building a car antenna signal booster is a rewarding project that enhances your driving experience with clear radio reception. By following this guide and using the schematic from a2ahelp.com, you can create an effective booster tailored to your needs. Explore more electronics projects on our site and subscribe for the latest DIY tips!
