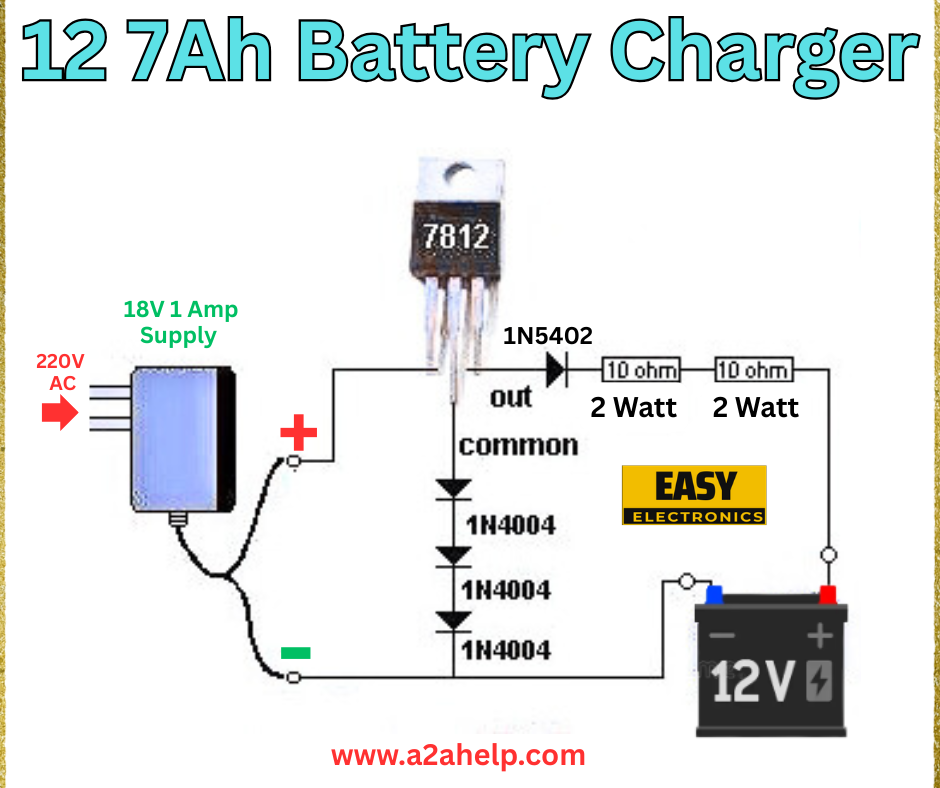
Are you looking to create an efficient and reliable 12V 7Ah battery charger for your DIY projects or power backup needs? Building your own battery charger can save you money and give you a sense of accomplishment. In this comprehensive guide, we’ll walk you through the process of constructing a 12V 7Ah battery charger using a simple circuit diagram. Whether you’re an electronics enthusiast or a beginner, this step-by-step tutorial will help you get started. Let’s dive into the details!
Understanding the 12V 7Ah Battery Charger Circuit
The circuit diagram for a 12V 7Ah battery charger is straightforward and uses commonly available components. This design ensures safe and effective charging for your 12V battery. The key components include a 7812 voltage regulator, 1N5402 diode, 1N4004 diodes, and 10-ohm 2-watt resistors. Let’s break down the setup and understand how it works.
Components Required
- 18V 1A Power Supply: Converts AC to DC to power the circuit.
- 7812 Voltage Regulator: Maintains a steady 12V output to charge the battery.
- 1N5402 Diode: Acts as a protection diode to prevent reverse current flow.
- 1N4004 Diodes (x3): Used for rectification and voltage regulation.
- 10-ohm 2-watt Resistors (x2): Limits current to protect the circuit.
- 12V 7Ah Battery: The battery to be charged.
- Connecting Wires and Breadboard: For assembling the circuit.
Step-by-Step Guide to Building the 12V 7Ah Battery Charger

Step 1: Gather Your Tools and Components
Before starting, ensure you have all the necessary tools and components listed above. A soldering iron, multimeter, and insulated wires will also be helpful for a secure assembly.
Step 2: Set Up the Power Supply
Connect the 18V 1A power supply to the circuit. This supply will provide the initial voltage, which the 7812 regulator will step down to 12V. Ensure the positive and negative terminals are correctly aligned as shown in the diagram.
Step 3: Install the 7812 Voltage Regulator
Place the 7812 voltage regulator in the circuit. Connect the input pin to the positive terminal of the power supply and the output pin to the common point. The ground pin should be connected to the negative terminal. This regulator ensures a stable 12V output for safe charging.
Step 4: Add the 1N5402 Diode
Connect the 1N5402 diode between the output of the 7812 regulator and the common point. This diode protects the circuit by preventing reverse current flow from the battery back into the regulator.
Step 5: Connect the 1N4004 Diodes
Attach three 1N4004 diodes in series from the common point to the positive terminal of the 12V 7Ah battery. These diodes help in voltage drop and rectification, ensuring the battery charges efficiently.
Step 6: Include the 10-ohm Resistors
Place two 10-ohm 2-watt resistors in series after the 1N5402 diode. These resistors limit the current flow, protecting the circuit and battery from overcharging.
Step 7: Connect the Battery
Finally, attach the 12V 7Ah battery to the circuit. Connect the positive terminal of the battery to the junction of the 1N4004 diodes and the negative terminal to the ground of the circuit. Double-check all connections before powering on.
Step 8: Test the Circuit
Turn on the power supply and use a multimeter to measure the output voltage across the battery terminals. It should read approximately 12V. Monitor the charging process and ensure the battery does not overheat.
Safety Tips for Building Your Battery Charger
- Always wear insulated gloves and safety goggles.
- Double-check polarity to avoid damaging the components.
- Use a multimeter to verify voltage and current levels.
- Avoid short circuits by insulating exposed wires.
Benefits of a DIY 12V 7Ah Battery Charger
Building your own charger offers several advantages:
- Cost-Effective: Save money compared to buying a pre-made charger.
- Customizable: Tailor the circuit to your specific needs.
- Educational: Gain hands-on experience with electronics.
Troubleshooting Common Issues
- No Output Voltage: Check the power supply and connections.
- Overheating: Ensure resistors and regulators are adequately rated.
- Slow Charging: Verify the current limiting resistors and diode setup.
Conclusion
Creating a 12V 7Ah battery charger is a rewarding project for electronics enthusiasts. By following this guide, you can build a reliable charger using simple components and ensure your 12V battery is always ready for use. For more electronics projects and tutorials, visit www.a2haelp.com. Start building today and power up your DIY journey!
