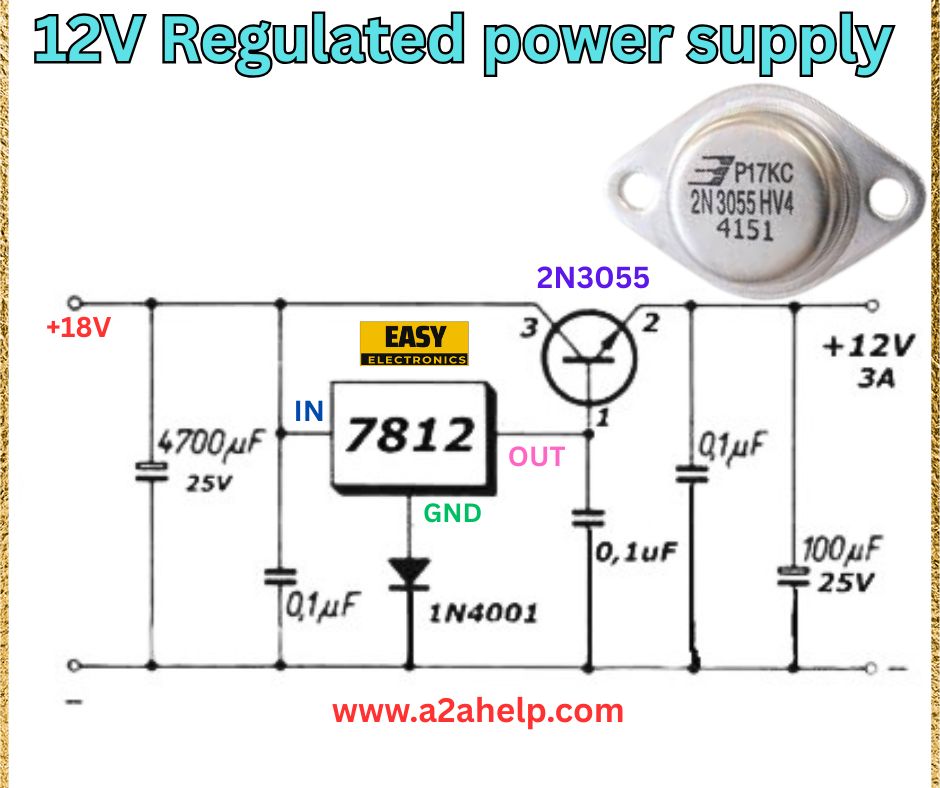
Are you an electronics hobbyist or professional looking to create a stable 12V regulated power supply for your projects? A reliable power supply is the backbone of any electronic circuit, and building your own can be both cost-effective and educational. In this detailed guide, we’ll walk you through constructing a 12V 3A regulated power supply using a simple circuit diagram. Ideal for beginners and experts alike, this tutorial will help you power your devices efficiently. Let’s get started!
Understanding the 12V 3Amp Regulated Power Supply Circuit
A regulated power supply ensures a constant 12V output regardless of input fluctuations or load changes. This circuit uses the 7812 voltage regulator, a 2N3055 transistor for current amplification, and supporting components like capacitors and a diode. The design is straightforward and uses widely available parts, making it perfect for DIY enthusiasts.
Components Required
- 18V Input Voltage: Provides the initial power source.
- 4700µF/25V Capacitor: Filters the input voltage.
- 0.1µF Capacitor (x2): Stabilizes the regulator and output.
- 7812 Voltage Regulator: Maintains a steady 12V output.
- 1N4001 Diode: Protects against reverse voltage.
- 2N3055 Transistor: Boosts current to 3A.
- 100µF/25V Capacitor: Smooths the output voltage.
- Connecting Wires and Heat Sink: For assembly and heat dissipation.
Step-by-Step Guide to Building the 12V Regulated Power Supply

Step 1: Gather Your Tools and Components
Collect all the listed components and tools, including a soldering iron, multimeter, and heat sink. A well-ventilated workspace is essential for safety.
Step 2: Set Up the Input Filter
Connect the 4700µF/25V capacitor across the +18V and ground terminals. This capacitor filters out noise and stabilizes the input voltage before it reaches the regulator.
Step 3: Install the 7812 Voltage Regulator
Place the 7812 voltage regulator in the circuit. Connect the input (IN) pin to the positive terminal of the capacitor, the ground (GND) pin to the negative terminal, and the output (OUT) pin to the next stage. Add a 0.1µF capacitor between the input and ground for stability.
Step 4: Add the 1N4001 Diode
Connect the 1N4001 diode between the ground pin of the 7812 and the emitter of the 2N3055 transistor. This diode protects the circuit by preventing reverse current flow.
Step 5: Incorporate the 2N3055 Transistor
Attach the 2N3055 transistor to a heat sink to manage heat dissipation. Connect the collector to the +18V input, the emitter to the output, and the base to the output of the 7812 regulator. This transistor amplifies the current to deliver up to 3A.
Step 6: Add Output Filtering
Place a 0.1µF capacitor between the emitter of the 2N3055 and ground, followed by a 100µF/25V capacitor across the output terminals. These capacitors smooth the 12V 3A output.
Step 7: Test the Circuit
Apply 18V to the input and use a multimeter to measure the output voltage. It should read approximately 12V with a 3A load. Ensure the transistor and regulator do not overheat.
Safety Tips for Building Your Power Supply
- Wear insulated gloves and safety goggles.
- Use a heat sink for the 2N3055 transistor.
- Check all connections to avoid short circuits.
- Monitor voltage and current with a multimeter.
Benefits of a DIY 12V Regulated Power Supply
- Reliable Output: Ensures stable 12V for your projects.
- Cost-Effective: Save money compared to commercial units.
- Customizable: Adapt the design to your needs.
Troubleshooting Common Issues
- No Output Voltage: Verify input voltage and regulator connections.
- Overheating: Ensure proper heat sinking and load limits.
- Unstable Output: Check capacitor values and wiring.
Conclusion
Building a 12V regulated power supply is a valuable skill for any electronics enthusiast. With this guide, you can create a robust 12V 3A power source using simple components. For more electronics projects and tutorials, visit www.a2ahelp.com. Start building today and power up your creations!
