Are you searching for a reliable way to create a regulated power supply that can handle a wide input range of 1.2V to 32V with a 6A output? This article dives into building a 1.2V to 32V 6A regulated voltage power supply using the LM338 voltage regulator. Perfect for electronics enthusiasts and professionals alike, this step-by-step guide will help you construct a stable and efficient power source for your projects. Let’s get started!
What is a Regulated Voltage Power Supply?
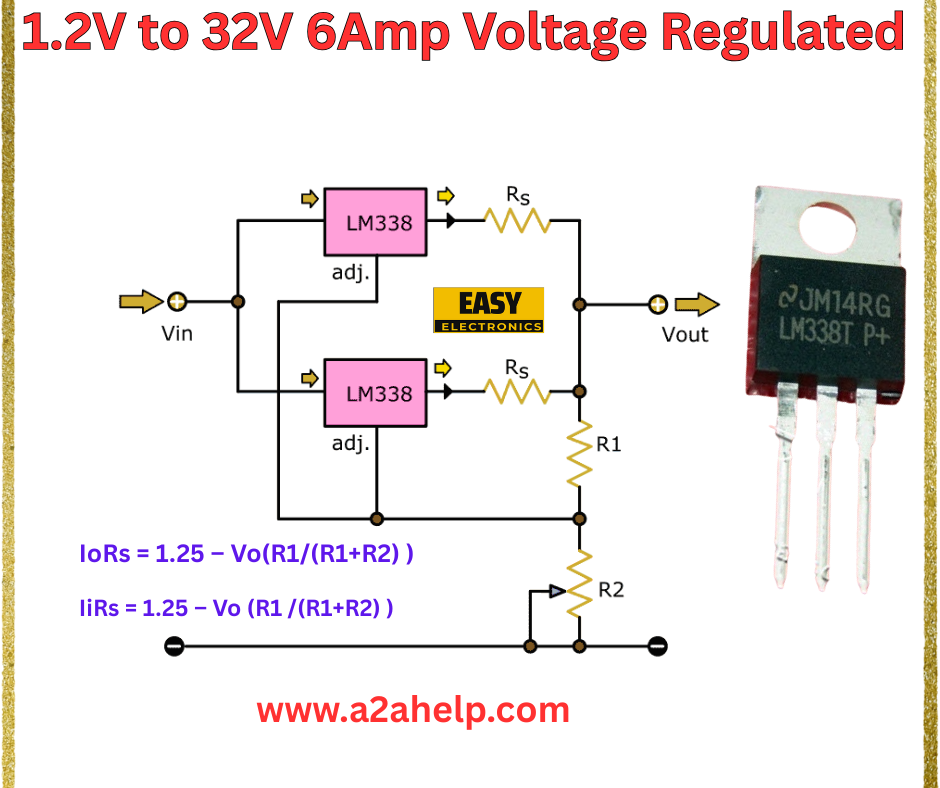
A regulated voltage power supply delivers a constant output voltage regardless of changes in input voltage or load current. The circuit in the image utilizes the LM338 adjustable voltage regulator, capable of providing up to 6A of current, making it ideal for powering high-current devices like motors, amplifiers, and LED arrays.
Components Needed
To build this 1.2V to 32V 6A regulated power supply, gather the following components:
- LM338 Adjustable Voltage Regulator: The core component for voltage regulation.
- LM338T P+ (TO-220 Package): A specific variant for higher current handling.
- Resistors (R1, R2, Rs): Used for setting the output voltage and current limiting.
- Heat Sink: Essential for dissipating heat from the LM338.
- Capacitors: For input and output filtering (if required, based on your setup).
- Wires and PCB: For connecting and mounting the components.
- Power Supply: Input source ranging from 1.2V to 32V.
Circuit Diagram Analysis
The schematic showcases a straightforward design using two LM338 regulators in parallel for enhanced current capacity. Here’s a breakdown:

- Input (Vin): The input voltage (1.2V to 32V) is fed into the LM338 regulators.
- Adjustment Pins (adj.): The adjust pins of the LM338s are connected to a voltage divider network (R1 and R2) to set the output voltage.
- Sense Resistor (Rs): Monitors and limits the current, ensuring the circuit delivers up to 6A safely.
- Output (Vout): The regulated output voltage is taken from the output pins of the LM338T P+ regulators.
The key equations for this circuit are:
- IoRs = 1.25 – Vo (R1/(R1+R2)): Output current calculation.
- IiRs = 1.25 – Vo (R1/(R1+R2)): Input current reference.
These formulas allow you to calculate and adjust the output voltage by selecting appropriate resistor values.
Step-by-Step Assembly Guide
- Prepare the PCB: Design or etch a PCB to accommodate the LM338 regulators and associated components.
- Mount the LM338 Regulators: Secure the LM338T P+ regulators to the PCB and attach heat sinks to prevent overheating.
- Connect the Resistors: Solder R1, R2, and Rs according to the schematic. Use a multimeter to verify resistance values.
- Wire the Circuit: Connect the input voltage source to Vin and link the adjust pins to the resistor network.
- Test the Circuit: Apply power and use a multimeter to measure the output voltage. Adjust R1 and R2 to achieve the desired 32V output.
- Final Checks: Ensure the current does not exceed 6A and that the regulators remain cool under load.
Safety Precautions
- Always use a heat sink with the LM338 to manage heat dissipation.
- Verify polarity and voltage ratings to avoid damaging components.
- Test with a low load initially to ensure stability.
Applications
This 1.2V to 32V 6A regulated power supply is perfect for:
- Powering high-current electronics projects.
- Charging batteries requiring adjustable voltage.
- Driving motors and other heavy-duty applications.
Troubleshooting Tips
- No Output Voltage: Check connections and ensure the input voltage is within the 1.2V to 32V range.
- Overheating: Add a larger heat sink or improve ventilation.
- Unstable Output: Recheck resistor values and connections in the voltage divider.
Conclusion
Building a 1.2V to 32V 6A regulated voltage power supply with the LM338 is a practical and rewarding project for any electronics enthusiast. This circuit offers versatility and reliability for a wide range of applications. For more detailed schematics and electronics tutorials, visit www.a2ahelp.com. Start building your power supply today and power up your innovations!
