Are you an audio enthusiast looking to enhance your listening experience? Building a stereo headphone amplifier is a rewarding DIY electronics project that can boost the sound quality of your headphones. This guide will walk you through creating a stereo headphone amplifier using a TL082 op-amp, perfect for beginners and experienced hobbyists alike. Let’s get started with this step-by-step tutorial!
What Is a Stereo Headphone Amplifier?
A stereo headphone amplifier is a device that increases the power of an audio signal to drive headphones, delivering clearer and louder sound. This project uses the TL082 dual op-amp IC, which provides two independent amplifiers for the left and right audio channels, ensuring a balanced stereo output. It’s an excellent way to learn about op-amps, audio circuits, and signal amplification.
Materials Needed
Gather the following components to build your stereo headphone amplifier:
- TL082 Op-Amp IC
- 100kΩ Resistor (x4)
- 15kΩ Resistor (x2)
- 1kΩ Resistor (x2)
- 50kΩ Dual Potentiometer
- 10µF Capacitor (x2)
- 100µF Capacitor (x2)
- LED
- 9V Battery (x2) or Dual Power Supply (±9V)
- Breadboard or PCB
- Connecting wires
Circuit Diagram Explanation
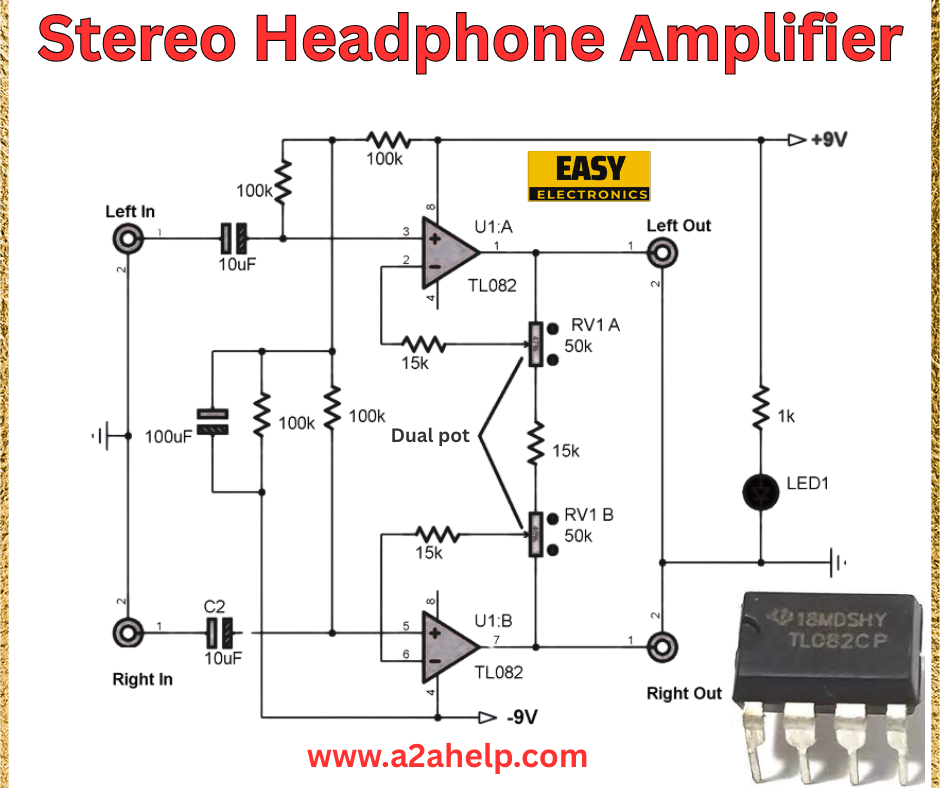
The circuit diagram showcases a simple yet effective design. Here’s a breakdown of the connections:
- Power Supply: Uses a dual power supply with +9V and -9V to power the op-amps.
- TL082 Op-Amp: Contains two op-amps (U1A and U1B) for stereo amplification.
- Resistors and Capacitors: Set the gain and filter the audio signal, with capacitors blocking DC components.
- Dual Potentiometer: Acts as a volume control for both channels.
- LED: Indicates power status.

Step-by-Step Guide to Building the Stereo Headphone Amplifier
Step 1: Prepare the Breadboard
Place the TL082 IC on the breadboard. Ensure pin 4 is connected to -9V and pin 8 to +9V. Pin 1 and pin 5 (outputs) will connect to the headphone jacks.
Step 2: Connect the Input Stage
- For the left channel, connect the “Left In” to a 10µF capacitor, then to pin 3 (non-inverting input) of U1A via a 100kΩ resistor.
- For the right channel, connect “Right In” to another 10µF capacitor, then to pin 5 of U1B via a 100kΩ resistor.
- Add a 100µF capacitor between ground and the input side of each 10µF capacitor for decoupling.
Step 3: Set Up the Amplification
- Connect a 100kΩ resistor between pin 2 (inverting input) and pin 1 (output) of U1A.
- Connect a 15kΩ resistor between pin 2 and ground to set the gain.
- Repeat this for U1B with pins 6 and 5.
Step 4: Add the Volume Control
- Connect the 50kΩ dual potentiometer (RV1A for left, RV1B for right) between the outputs (pin 1 and pin 5) and a 1kΩ resistor.
- Link the other end of the 1kΩ resistors to the “Left Out” and “Right Out” headphone jacks.
Step 5: Include the Power Indicator
- Connect the LED with a current-limiting resistor (e.g., 1kΩ) between +9V and ground to indicate the circuit is powered.
Step 6: Test the Amplifier
Connect your headphones to the output jacks and an audio source to the inputs. Adjust the potentiometer to control the volume and enjoy enhanced sound quality.
How Does It Work?
The TL082 op-amp amplifies the weak audio signal from your source (e.g., phone or MP3 player) for each channel. The 100kΩ and 15kΩ resistors determine the gain, while the capacitors block DC offset. The dual potentiometer allows independent volume control for both channels, and the LED confirms the circuit is active. This setup delivers a clean, powerful audio output to your headphones.
Safety Precautions
- Power Supply: Ensure correct polarity to avoid damaging the op-amp.
- Volume Levels: Avoid setting the volume too high to prevent ear damage.
- Component Handling: Use proper tools to avoid static discharge on sensitive components.
Troubleshooting Tips
- No Sound: Check power connections and ensure the audio source is working.
- Distorted Output: Verify resistor values and capacitor polarity.
- LED Not Lighting: Confirm the LED and resistor are correctly wired.
Benefits of Building a Stereo Headphone Amplifier
- Improved Audio Quality: Enhances sound for low-impedance headphones.
- Cost-Effective: Uses affordable, widely available components.
- Learning Opportunity: Gain hands-on experience with op-amps and audio circuits.
Conclusion
Building a stereo headphone amplifier is a fantastic project for audio lovers and electronics enthusiasts. This guide provides all the steps to create a functional amplifier using the TL082 IC. For more exciting electronics projects and detailed tutorials, visit www.a2ahelp.com. Start building and enjoy your upgraded audio experience today!
