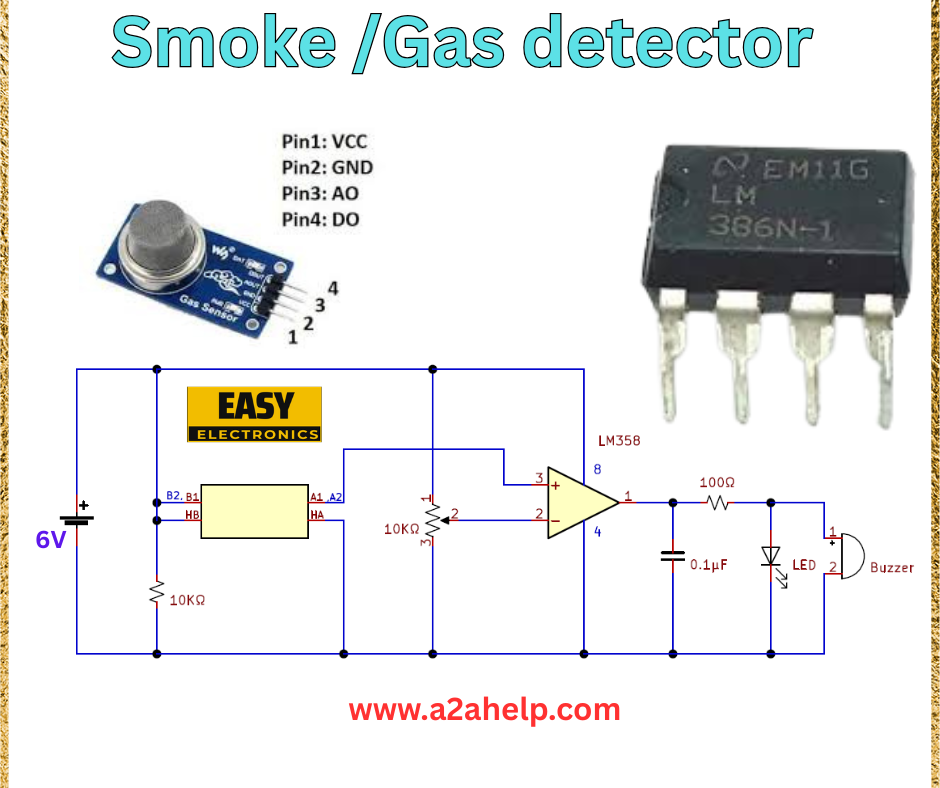
Are you looking to enhance the safety of your home or workplace with a DIY smoke and gas detector? Building your own smoke/gas detector circuit is a rewarding project that combines basic electronics knowledge with practical application. In this comprehensive guide, we’ll walk you through the process of creating a smoke/gas detector using simple components, including a gas sensor and an LM358 operational amplifier. Let’s dive into the details!
Understanding the Smoke/Gas Detector Circuit
A smoke/gas detector is an essential device that alerts you to the presence of harmful gases or smoke, helping to prevent potential hazards. The circuit we’re exploring uses a gas sensor module and an LM358 IC to detect smoke or gas levels and trigger an alarm. This project is perfect for hobbyists and electronics enthusiasts who want to learn while creating a functional safety device.
Components Required
- Gas Sensor Module: Detects smoke or gas (e.g., MQ-2 sensor).
- LM358 IC: A dual operational amplifier for signal processing.
- Resistors: 10kΩ and 1kΩ.
- Capacitor: 0.1µF.
- LED: For visual indication.
- Buzzer: For audible alarm.
- 6V Power Supply: To power the circuit.
- Connecting Wires and Breadboard: For assembling the circuit.

Circuit Diagram Analysis
The provided circuit diagram outlines a straightforward design. Here’s a breakdown of the connections:
- Power Supply: The circuit is powered by a 6V supply connected to the gas sensor and other components.
- Gas Sensor Connections:
- Pin 1 (VCC): Connected to the positive terminal of the 6V supply.
- Pin 2 (GND): Connected to the ground.
- Pin 3 (AO): Analog output connected to the non-inverting input (pin 3) of the LM358.
- Pin 4 (DO): Digital output (optional use in this circuit).
- LM358 Configuration: The LM358 is wired as a comparator. The inverting input (pin 2) is connected to a voltage divider (10kΩ resistors) to set a reference voltage. The non-inverting input (pin 3) receives the analog signal from the gas sensor.
- Output Stage: The output of the LM358 (pin 1) drives an LED and buzzer through a 1kΩ resistor and a 0.1µF capacitor for stability. The LED lights up, and the buzzer sounds when gas/smoke is detected.
How the Smoke/Gas Detector Works
The gas sensor detects the presence of smoke or gas, altering its resistance based on the concentration. This change produces an analog voltage at the AO pin, which is fed into the LM358. The op-amp compares this voltage with a preset reference voltage. If the sensor voltage exceeds the reference, the output switches, activating the LED and buzzer to alert you.
Step-by-Step Assembly
- Prepare the Breadboard: Set up your breadboard and connect the 6V power supply.
- Connect the Gas Sensor: Wire the sensor as per the diagram, ensuring correct pin assignments.
- Wire the LM358: Connect the resistors and capacitor to configure the op-amp as a comparator.
- Attach the Output Devices: Link the LED and buzzer to the LM358 output with the 1kΩ resistor.
- Test the Circuit: Power on the circuit and expose the sensor to smoke or gas to verify the alarm triggers.
Tips for Optimization
- Calibration: Adjust the reference voltage using the voltage divider to set the sensitivity.
- Enclosure: Place the circuit in a protective casing for safe use.
- Maintenance: Regularly clean the sensor to ensure accurate readings.
Benefits of a DIY Smoke/Gas Detector
- Cost-Effective: Build it at a fraction of the cost of commercial detectors.
- Customizable: Tailor the sensitivity and alarm type to your needs.
- Educational: Gain hands-on experience with electronics and sensors.
Safety Precautions
- Handle the 6V supply with care to avoid short circuits.
- Test the detector in a well-ventilated area.
- Avoid exposing the sensor to extreme temperatures.
Conclusion
Building a smoke/gas detector circuit is a fantastic way to blend learning with practical safety solutions. With the right components and a clear understanding of the circuit, you can create a reliable device to protect your environment. Visit www.a2ahelp.com for more DIY electronics projects and tutorials. Start your project today and enhance your safety with this easy-to-build detector!
