Introduction
A 12V dual power supply circuit is a must-have for electronics projects requiring both positive (+12V) and negative (-12V) voltages. This setup is ideal for powering operational amplifiers, audio circuits, and other analog systems. In this guide, we’ll show you how to build a reliable 12V dual power supply using the 7812 and 7912 voltage regulators. Whether you’re a beginner or an experienced hobbyist, this detailed tutorial will help you create a DIY dual power supply for your projects, optimized for performance and simplicity.
What is a 12V Dual Power Supply?
A 12V dual power supply delivers two stable output voltages: +12V and -12V, with a shared ground. This split supply is essential for circuits like op-amps, audio amplifiers, and signal processing systems that require both positive and negative voltages. The circuit we’ll explore uses a center-tapped transformer, a bridge rectifier, and 7812/7912 voltage regulators to provide clean, stable dual outputs.
Components Needed for a 12V Dual Power Supply
To assemble this 12V dual power supply circuit, gather these components:
- Step-down Transformer (230V to 15-0-15V): Steps down the 230V AC mains to a center-tapped 15V AC.
- Bridge Rectifier (1N4007 x 4): Converts AC to DC for the dual voltage supply.
- Capacitors:
- 1000µF (25V) x 2: Smooths the rectified DC voltage.
- 10µF (16V) x 2: Filters noise at the regulator outputs.
- 0.1µF x 2: Suppresses high-frequency noise in the dual power supply circuit.
- Voltage Regulators:
- 7812 Voltage Regulator: Outputs a stable +12V.
- 7912 Voltage Regulator: Outputs a stable -12V.
- Wires and Breadboard/PCB: For assembling the DIY 12V power supply.
Circuit Diagram and Working Principle of a 12V Dual Power Supply
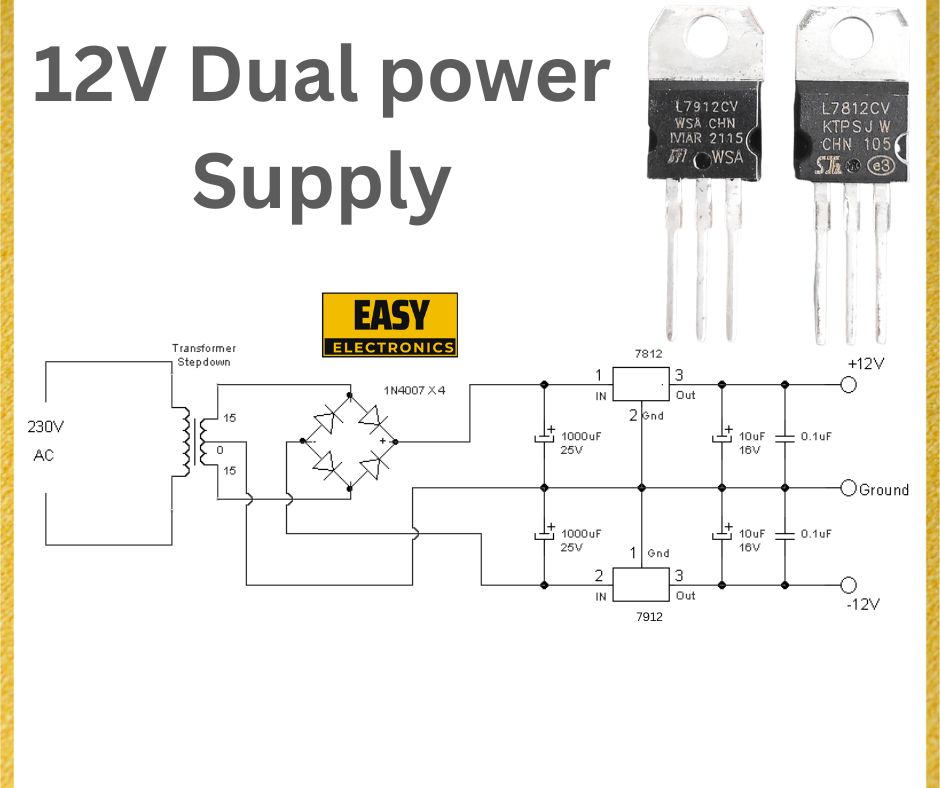
The 12V dual power supply circuit begins with a 230V AC input, stepped down to 15-0-15V AC using a center-tapped transformer. The center tap acts as the ground, providing +15V and -15V relative to it. Here’s how the circuit works:
- Step-Down Transformer: Converts 230V AC to 15-0-15V AC using a center-tapped transformer.
- Bridge Rectifier: Four 1N4007 diodes form a bridge rectifier, converting AC to pulsating DC, resulting in +15V and -15V DC.
- Smoothing Capacitors: Two 1000µF capacitors (25V) smooth the DC voltage for the dual voltage power supply.
- Voltage Regulation:
- The 7812 voltage regulator outputs a stable +12V.
- The 7912 voltage regulator outputs a stable -12V.
- Filtering Capacitors: 10µF and 0.1µF capacitors at the regulator outputs ensure a noise-free 12V dual power supply.
The final output provides +12V, ground (0V), and -12V, ready for your electronics projects.

Step-by-Step Guide to Build a 12V Dual Power Supply
Follow these steps to assemble your DIY 12V dual power supply:
- Set Up the Transformer: Connect the 230V AC to the primary of the 15-0-15V center-tapped transformer. Ensure proper insulation for safety.
- Build the Bridge Rectifier: Use four 1N4007 diodes to create a bridge rectifier. Connect the transformer’s secondary (15V and -15V) to the AC inputs.
- Add Smoothing Capacitors: Place a 1000µF capacitor across the positive output and ground, and another across the negative output and ground.
- Connect the Voltage Regulators:
- For the 7812 regulator: Pin 1 (IN) to the positive rectified voltage, Pin 2 (GND) to the center tap, Pin 3 (OUT) for +12V.
- For the 7912 regulator: Pin 1 (GND) to the center tap, Pin 2 (IN) to the negative rectified voltage, Pin 3 (OUT) for -12V.
- Add Output Capacitors: Connect 10µF and 0.1µF capacitors across each regulator output to ground for noise filtering.
- Test the Circuit: Use a multimeter to confirm the outputs are +12V and -12V with respect to ground. Check for short circuits.
Applications of a 12V Dual Power Supply
- Operational Amplifier Circuits: Op-amps often need a dual power supply for proper operation.
- Audio Amplifiers: Powers audio circuits for clean signal processing.
- Signal Generators: Supports analog signal generation in electronics projects.
- DIY Electronics Projects: Perfect for hobbyists building custom circuits with a 12V dual power supply.
Safety Tips for Building a 12V Dual Power Supply
- Disconnect power before working on the dual power supply circuit.
- Use capacitors with proper voltage ratings (e.g., 25V for 1000µF capacitors).
- Verify the polarity of capacitors and the pin configuration of the 7812 and 7912 regulators to prevent damage.
Why Use 7812 and 7912 Voltage Regulators in a Dual Power Supply?
The 7812 and 7912 voltage regulators are linear regulators that ensure stable +12V and -12V outputs with minimal ripple. The 7812 handles positive voltage, while the 7912 manages negative voltage, making them ideal for a 12V dual power supply circuit. They’re affordable, widely available, and easy to use for DIY electronics projects.
Troubleshooting Common Issues in a 12V Dual Power Supply
- No Output Voltage: Check the center-tapped transformer, 1N4007 diodes, and regulator connections.
- Incorrect Voltage: Ensure the input voltage to the 7812/7912 regulators is correct and capacitors are functional.
- Overheating Regulators: Verify the input voltage isn’t too high, and consider adding a heatsink to the 7812 and 7912.
Conclusion
Building a 12V dual power supply is a simple yet powerful project for any electronics enthusiast. Using the 7812 and 7912 voltage regulators, you can create a stable dual voltage power supply for your op-amp circuits, audio amplifiers, or other DIY electronics projects. This step-by-step guide makes it easy to assemble a DIY 12V power supply that’s reliable and versatile. Start your project today and power your circuits with confidence!
