Are you fascinated by the world of radio and eager to build your device? An AM radio receiver is a classic electronics project that lets you tune into amplitude modulation broadcasts using simple components. In this guide, we’ll walk you through constructing a basic AM radio receiver using an OC13 transistor, perfect for hobbyists and beginners. Let’s dive into this fun and educational project!
What is an AM Radio Receiver?
An AM radio receiver is an electronic device that picks up amplitude-modulated radio signals, commonly used for broadcasting news, music, and talk shows. This DIY version uses a single transistor circuit to demodulate the signal, allowing you to listen through a headphone. It’s a great way to learn about radio frequency (RF) principles and analog electronics.
Analyzing the Circuit Diagram
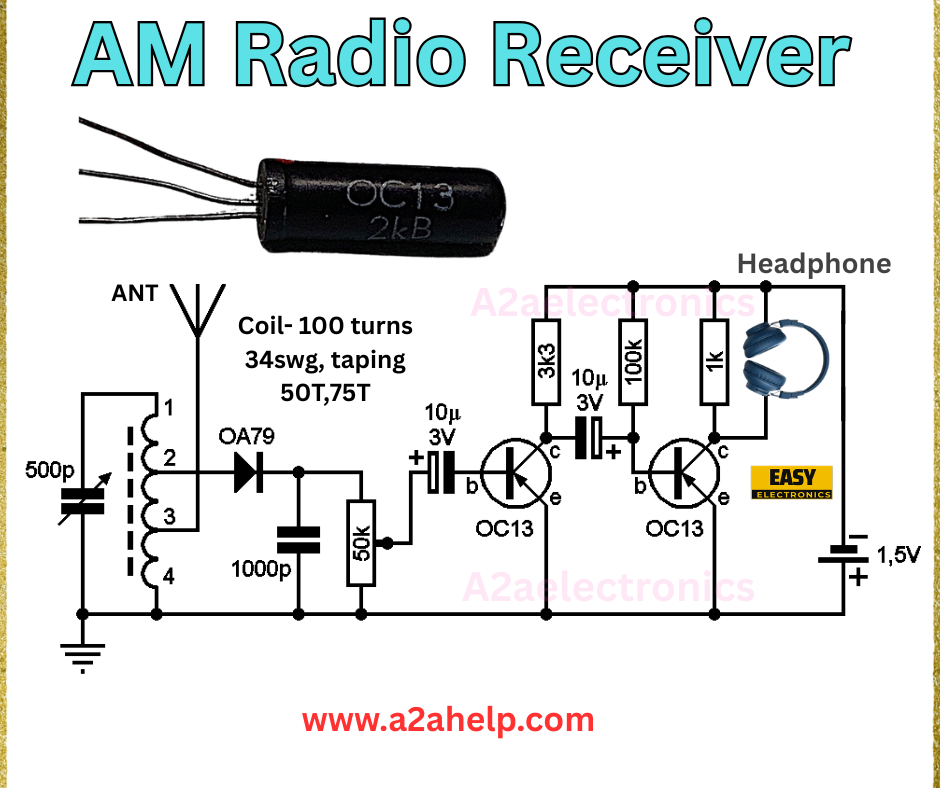
The schematic above outlines an AM radio receiver with the following components and their roles:
- Coil (100 turns, 34swg): A hand-wound coil with a tap at 50T/75T, acting as the antenna and tuner.
- OA79 Diode: Detects and demodulates the AM signal.
- OC13 Transistors (Q1, Q2): Amplify the audio signal for headphone output.
- C1 (500pF Capacitor): Tunes the circuit to the desired AM frequency.
- C2 (1000pF Capacitor): Filters the demodulated signal.
- R1 (50kΩ Resistor): Sets the bias for the first transistor.
- R2 (10kΩ Resistor): Limits current to the second transistor.
- R3 (1kΩ Resistor): Matches the headphone impedance.
- C3 (10µF Capacitor): Couples the audio signal to the headphone.
- 1.5V Battery: Powers the circuit.
Step-by-Step Guide to Building the AM Radio Receiver
Materials Needed
- OC13 PNP transistors (2)
- OA79 germanium diode
- 34swg enameled copper wire (for 100-turn coil)
- Capacitors: 500pF, 1000pF, 10µF
- Resistors: 50kΩ, 10kΩ, 1kΩ
- 500pF variable capacitor
- Headphone with 1kΩ impedance
- 1.5V battery
- Antenna wire (e.g., 1-2 meters)
- Breadboard or PCB
- Soldering iron, solder, and flux
- Multimeter for testing

Assembly Instructions
- Wind the Coil: Create a 100-turn coil using 34swg wire on a cylindrical form (e.g., a pencil). Tap at 50 turns and 75 turns. Connect one end to the antenna and the other to ground.
- Set Up the Tuner: Connect the 500pF variable capacitor (C1) in parallel with the coil to form the LC tank circuit. Attach the OA79 diode across the tap points.
- Add the First Transistor: Place the first OC13 transistor. Connect the collector to +1.5V via R1 (50kΩ), the base to the diode output via C2 (1000pF), and the emitter to ground.
- Wire the Second Transistor: Use the second OC13 transistor. Connect the base to the first transistor’s collector via R2 (10kΩ), the collector to +1.5V via R3 (1kΩ), and the emitter to ground.
- Connect the Headphone: Link C3 (10µF) between the second transistor’s collector and the headphone input.
- Attach the Antenna and Power: Connect the antenna wire to the coil and the 1.5V battery to the circuit. Ground the negative terminal.
- Test the Receiver: Adjust the variable capacitor to tune into an AM station. Listen through the headphones for clear audio.
Safety Tips
- Handle the battery and wires carefully to avoid short circuits.
- Use a multimeter to check voltage levels during assembly.
- Keep the antenna away from power lines for safety.
How It Works
The antenna picks up AM radio waves, which are tuned by the coil and variable capacitor. The OA79 diode demodulates the signal, extracting the audio. The OC13 transistors amplify this audio, which is then coupled to the headphone via C3, allowing you to hear the broadcast.
Applications of an AM Radio Receiver
- Educational Tool: Learn about RF and audio amplification.
- Emergency Use: Listen to AM broadcasts during power outages.
- Hobby Projects: Build a portable radio for outdoor activities.
Troubleshooting Common Issues
- No Sound: Check the coil connections and antenna length.
- Weak Signal: Adjust the variable capacitor or extend the antenna.
- Distortion: Verify resistor and capacitor values.
Why Use OC13 Transistors?
The OC13 is a reliable transistor for low-power audio amplification, making it ideal for this simple AM receiver. Its availability and ease of use suit beginner projects perfectly.
Conclusion
Building an AM radio receiver with OC13 transistors is a fantastic way to explore radio electronics. Follow this guide to create your own and enjoy tuning into AM stations. For more DIY electronics projects, visit www.a2ahelp.com. Have questions? Drop a comment below!
