Are you eager to explore the world of radio communication? Building an AM radio receiver is a fantastic project for electronics enthusiasts, hobbyists, and learners. This simple DIY guide will walk you through creating your own AM radio receiver using basic components. Perfect for beginners, let’s dive into the process and start tuning into AM broadcasts!
What is an AM Radio Receiver?
An AM (Amplitude Modulation) radio receiver picks up amplitude-modulated radio signals and converts them into audible sound. AM radio is widely used for broadcasting news, music, and talk shows, offering a nostalgic and educational experience. Building one yourself is a great way to understand radio frequency (RF) circuits and enhance your technical skills.
Components You’ll Need
To construct this AM radio receiver, gather the following parts:
- AF101 Transistor: Acts as the RF amplifier and detector.
- 1N34 Diode: Used for signal detection.
- Coil: Part of the tuned circuit (details vary, often a ferrite rod with winding).
- 470pF and 47nF Capacitors: For tuning and coupling.
- 500pF Variable Capacitor: Adjusts the tuning frequency.
- 8.2kΩ Resistors (2): For biasing the transistor.
- 25kΩ Potentiometer: Fine-tunes the circuit.
- 33kΩ Resistor: Sets the audio output level.
- 1nF Capacitor: Filters the audio signal.
- Choke: Prevents RF from entering the audio stage.
- Antenna: A simple wire to capture AM signals.
- Crystal Earphone: For audio output.
- 1.5V Battery: Powers the circuit.
- Breadboard and Connecting Wires: For assembly.
- Multimeter: To troubleshoot connections.
Circuit Diagram and Assembly
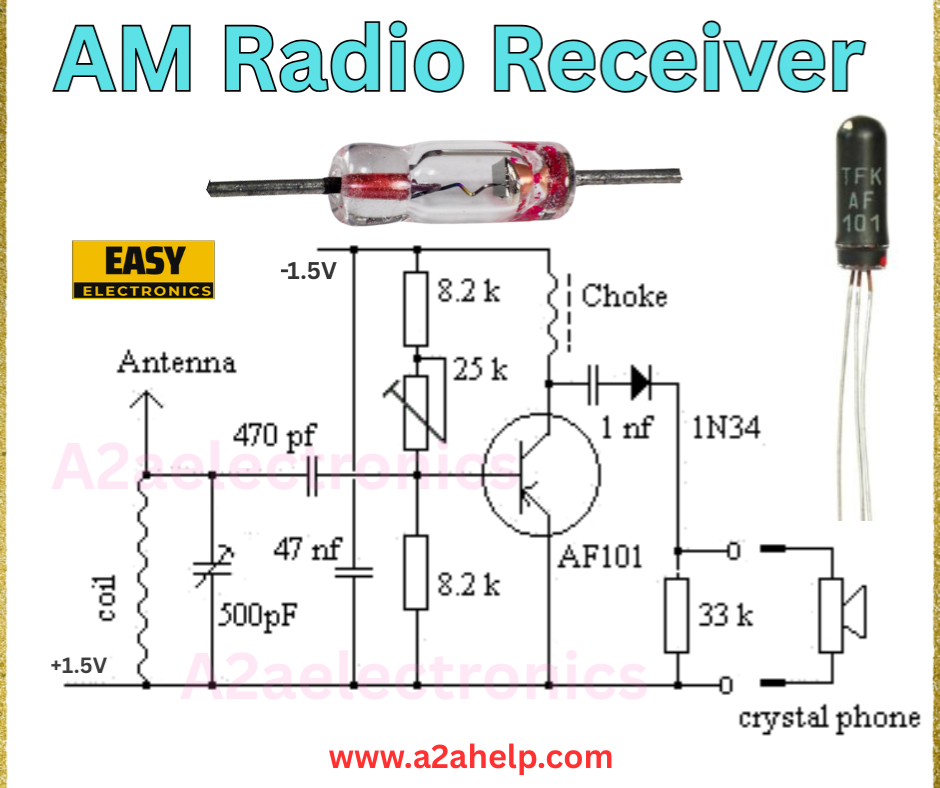
The circuit diagram in the image provides a clear layout for assembling the AM radio receiver. Follow these steps:

Step 1: Set Up the Antenna and Tuning Circuit
- Connect the antenna to one end of the coil.
- Link a 470pF capacitor in parallel with the coil, then connect the 500pF variable capacitor across this junction to ground.
- Attach the other end of the coil to the base of the AF101 transistor.
Step 2: Configure the Detector Stage
- Connect the 1N34 diode between the coil junction and the 47nF capacitor, with the other end of the capacitor tied to ground.
- Link the 25kΩ potentiometer across the diode, with the wiper connected to the base of the AF101 transistor.
- Add an 8.2kΩ resistor from the base to the -1.5V supply.
Step 3: Build the Audio Stage
- Connect the collector of the AF101 transistor to the +1.5V supply through another 8.2kΩ resistor.
- Attach the 1nF capacitor from the collector to the 33kΩ resistor, then connect to the crystal earphone.
- Ground the emitter of the transistor and the other end of the earphone.
Step 4: Add the Choke and Power
- Place the choke between the +1.5V supply and the collector circuit to block RF interference.
- Ensure all ground connections are common.
- Verify component orientations, especially the diode and transistor.
How It Works
The antenna and tuned circuit (coil and capacitors) capture AM signals. The AF101 transistor amplifies the RF signal, while the 1N34 diode detects the audio modulation. The potentiometer adjusts the tuning, and the audio stage drives the crystal earphone. The choke ensures clean audio output by filtering out RF noise.
Testing and Troubleshooting
- Power On: Apply 1.5V and adjust the variable capacitor to scan for AM stations.
- Check Audio: If no sound, ensure the antenna is extended and the battery is functional.
- Fine-Tune: Adjust the potentiometer and capacitor for clearer reception.
Benefits of Building an AM Radio Receiver
- Educational: Offers insights into RF and audio circuits.
- Low-Cost: Uses affordable, widely available components.
- Portable: Operates with a single battery and earphones.
Safety Tips
- Handle the battery and components with care to avoid short circuits.
- Use insulated tools to prevent accidental shocks.
- Double-check connections before powering on.
Conclusion
Building an AM radio receiver is a rewarding project that connects you to the basics of radio technology. With minimal components and careful assembly, you can enjoy listening to AM broadcasts. Visit www.a2ahelp.com for more electronics projects and tips. Start your radio journey today!
