If you’ve ever needed a portable power solution during an outage, a 100 watt inverter is a fantastic project to tackle. This device converts 12V DC from a battery into 100W AC power, perfect for running small appliances like a 100-watt bulb. As an experienced electronics engineer, I’ll walk you through a hand-drawn circuit diagram, explain its components, and provide a step-by-step guide to build your own. Whether you’re a DIY enthusiast or a professional, this article will empower you to create a reliable inverter.
What is a 100 Watt Inverter?
An inverter is an electronic circuit that transforms direct current (DC) from a battery—typically 12V—into alternating current (AC) suitable for household devices. A 100-watt inverter is ideal for low-power applications, offering a practical way to power lights or charge devices when grid electricity isn’t available. The circuit in the image is a simple yet effective design using common components.
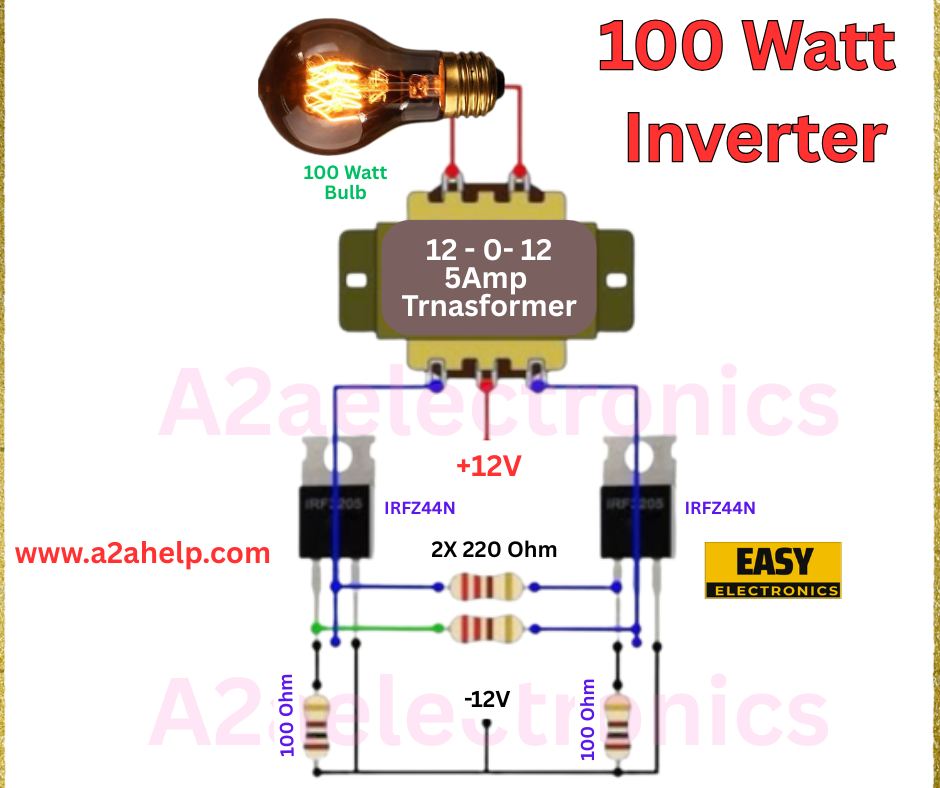
Analyzing the 100 Watt Inverter Circuit
Let’s break down the diagram step by step:
- Power Input
- The circuit uses a 12V DC input, sourced from a battery, with +12V and -12V terminals.
- MOSFETs and Switching
- Two IRF44N MOSFETs serve as the main switching elements. These N-channel MOSFETs handle the high-frequency switching needed to generate AC.
- Each MOSFET is paired with a 2x 220-ohm resistor network, which sets the gate voltage and ensures proper oscillation.
- Transformer
- A 12-0-12 5Amp transformer is the heart of the inverter. The 12V DC input is fed into the primary winding, and the secondary winding steps it up to 220V AC.
- The transformer’s center-tapped design allows the MOSFETs to alternate the current flow, creating the AC waveform.
- Output Stage
- The output connects to a 100-watt bulb, demonstrating the inverter’s capacity to power a small load.
- The transformer’s secondary winding delivers the 220V AC output, suitable for standard household devices.

How Does This Inverter Work?
The 12V DC from the battery is applied to the transformer’s primary winding through the IRF44N MOSFETs. The MOSFETs switch on and off rapidly, driven by the 220-ohm resistor network, creating a square-wave AC signal. The transformer steps up this signal to 220V AC, which is then used to power the 100-watt bulb. The simplicity of this design makes it efficient for low-power applications.
Benefits of a 100 Watt Inverter
- Portability: Runs on a 12V battery, ideal for camping or emergencies.
- Affordable: Uses readily available components like MOSFETs and transformers.
- Versatile: Powers small devices like lights or fans.
- Educational: Offers hands-on learning about power conversion.
Step-by-Step Guide to Building the Inverter
- Gather Components: Collect IRF44N MOSFETs, a 12-0-12 5Amp transformer, 220-ohm and 100-ohm resistors, and a 12V battery.
- Connect the MOSFETs: Wire the IRF44N MOSFETs to the transformer’s center-tapped primary, adding 2x 220-ohm resistors to each gate.
- Attach the Battery: Connect the 12V battery to the circuit, using 100-ohm resistors for current limiting.
- Link the Output: Connect the transformer’s secondary to a 100-watt bulb or socket.
- Test the Circuit: Switch on the battery and verify the bulb lights up. Use a multimeter to check the 220V AC output.
- Enclose Safely: Place the circuit in a ventilated box, ensuring proper insulation.
Troubleshooting Tips
- No Output: Check battery voltage and MOSFET connections.
- Overheating: Ensure the transformer and MOSFETs are adequately cooled.
- Weak Power: Verify the transformer rating and battery capacity.
Safety Precautions
- Handle 12V DC and 220V AC with care to avoid shocks.
- Use a fuse or current limiter to protect the circuit.
- Work in a well-ventilated area to dissipate heat.
Conclusion
Building a 100-watt inverter is a rewarding project that brings power to your fingertips. With the IRF44N MOSFETs, a 12-0-12 transformer, and a few resistors, you can create a reliable solution for small appliances. This guide equips you with the knowledge to build and troubleshoot your inverter. Explore more electronics projects on our site or share your experience in the comments!
