Introduction to LED Driver Circuits
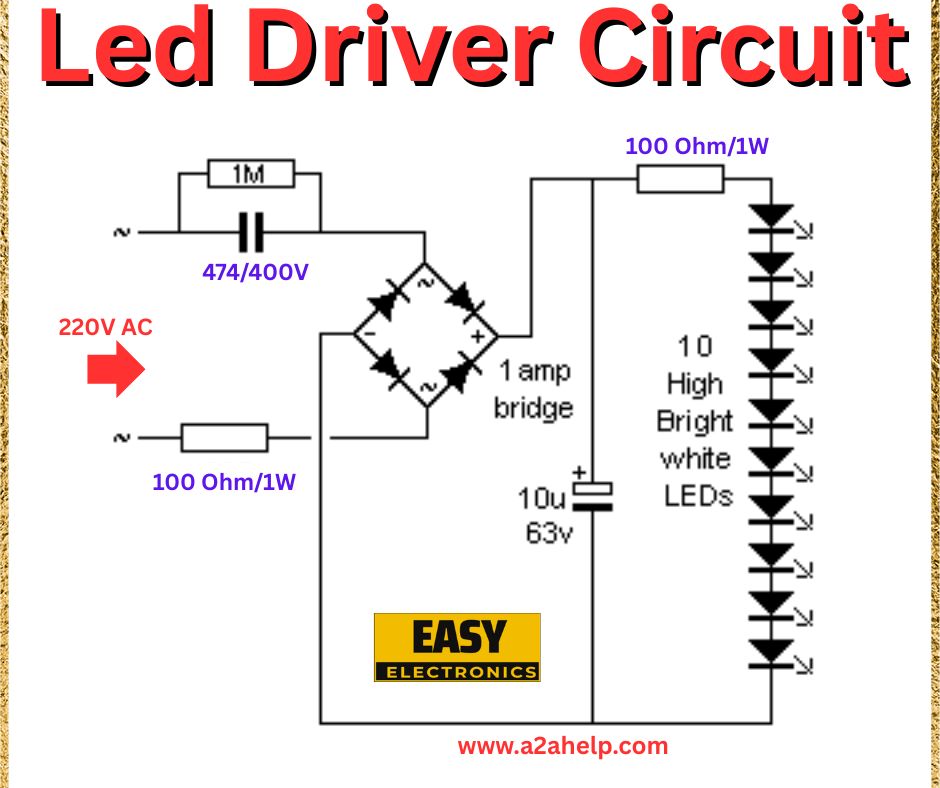
LEDs are a popular choice for energy-efficient lighting, but they require a stable current to operate safely and brightly. An LED driver circuit ensures this by converting and regulating power from an AC source. The schematic from www.a2ahelp.com and Easy Electronics offers a practical design for a 220V AC-powered LED driver with 10 high-brightness white LEDs. In this article, we’ll analyze the circuit, explain its components, and guide you through building your own LED driver for home or DIY projects.
What is an LED Driver Circuit?
An LED driver circuit is essential for powering LEDs by providing a constant current, protecting them from voltage fluctuations. This particular design uses a bridge rectifier and a current-limiting resistor to drive multiple LEDs in series, making it suitable for applications like indoor lighting, decorative lights, or DIY lamps.
Analyzing the LED Driver Circuit Schematic
Key Components
- 220V AC Input: The main power source for the circuit.
- 1mF 474/400V Capacitor: Reduces the AC voltage and acts as a current limiter.
- Bridge Rectifier: Converts AC to DC, consisting of four diodes.
- 100 Ohm/1W Resistor: Limits current to the LED string.
- 10µF 63V Capacitor: Smooths the rectified DC output.
- 10 High-Brightness White LEDs: Connected in series to form the light source.

Circuit Functionality
The 220V AC input passes through the 1mF capacitor, which drops the voltage and limits the current. The bridge rectifier converts this to DC, and the 10µF capacitor filters the output to reduce ripple. The 100 Ohm/1W resistor further controls the current, ensuring the 10 LEDs in series receive a safe and consistent power supply for bright illumination.
How the LED Driver Circuit Works
The 1mF capacitor reduces the high AC voltage to a level suitable for the LEDs. The bridge rectifier ensures unidirectional current flow, while the 10µF capacitor minimizes flickering by smoothing the DC output. The 100 Ohm resistor prevents overcurrent, protecting the LEDs. This simple design leverages capacitive dropper technology, making it cost-effective for low-power LED applications.
Advantages of This LED Driver Design
- Energy Efficient: Uses minimal components for LED operation.
- Cost-Effective: Relies on affordable parts like capacitors and resistors.
- Simple Assembly: Easy to build for hobbyists with basic skills.
- High Brightness: Supports 10 LEDs for ample light output.
Limitations
- No Isolation: Lacks a transformer, posing a safety risk with 220V AC.
- Fixed Load: Designed for 10 LEDs; adjustments are needed for different configurations.
- Limited Current Regulation: Relies on passive components rather than active regulation.
Applications of the LED Driver Circuit
This circuit is ideal for:
- Home Lighting: Creating custom LED strips or panels.
- Decorative Lighting: For festivals or indoor decor.
- DIY Projects: Perfect for electronics enthusiasts experimenting with LEDs.
Building Your Own LED Driver Circuit
Materials Needed
- 220V AC power source
- 1mF 474/400V capacitor
- Bridge rectifier (4 diodes)
- 100 Ohm/1W resistor
- 10µF 63V capacitor
- 10 high-brightness white LEDs
- Connecting wires and soldering kit
Step-by-Step Guide
- Connect the 220V AC input to the 1mF 474/400V capacitor.
- Wire the capacitor output to the bridge rectifier’s AC terminals.
- Attach the 10µF 63V capacitor across the rectifier’s DC output to smooth the voltage.
- Connect the 100 Ohm/1W resistor in series with the positive DC line.
- Link the 10 LEDs in series, connecting the string to the resistor and ground.
- Insulate all connections and house the circuit in a safe enclosure.
- Test the setup, ensuring proper current and brightness.
Always use a multimeter to check voltages and wear protective gear. Refer to www.a2help.com for additional support.
Safety Tips
- Work with 220V AC cautiously to avoid electric shock.
- Use an insulated enclosure to prevent accidental contact.
- Ensure proper grounding to reduce risk.
Conclusion
Building an LED driver circuit with this design is a great way to create efficient, bright lighting for your projects. The schematic from Easy Electronics provides a solid foundation for DIY enthusiasts. Explore more electronics tutorials on our site, and share your LED creations with us!
